
Editing Vectors #
Once you have some vectors, you can move, size, turn, copy, combine and reshape them. This chapter covers the mouse handles, node editing, the Transform Vectors and Edit Objects sections of the Drawing tab, and the Layers tab.
Most commands work on the selected vectors. See Selecting objects for how to select them.
Open and closed vectors #
A closed vector is a loop: its end joins its start, so it has an inside, like a circle or a rectangle. An open vector has two loose ends, like a line or an arc.
The difference matters for toolpaths. Pockets, V-carving, inlays and laser fills need closed vectors, because they work on the area inside. Profiles and engraving can follow open vectors too.
- In the 2D view an open vector has a small square at its start point.
- Close joins the ends of open vectors with a straight line.
- Join links open vectors whose ends meet into one, and closes it when it forms a loop.
- When you choose an operation that needs closed vectors, Carvio warns you about open vectors in the selection.
Moving, scaling and rotating with the mouse #
In Select mode, the selection has a box with eight square handles for scaling and four round handles outside the corners for rotating. Drag the selection itself to move it.
| To | Do this |
|---|---|
| Move | Drag a selected vector. Hold Shift to lock the move to horizontal, vertical or 45 degrees (guide lines show the direction); hold Ctrl to turn grid snapping off or on for this drag. |
| Scale | Drag a square handle. Corner handles keep the proportions (hold Shift to stretch freely); side handles stretch in one direction. The opposite handle stays put. |
| Rotate | Drag a round handle. The selection turns about the centre of its box. Hold Shift for 15 degree steps or Ctrl for 5 degree steps; the angle is shown beside the pointer. |
| Nudge | Press the arrow keys: one grid spacing per press, Shift for ten, Alt for a tenth. |
The same handles work in the 3D view, on the material surface. Images always stay upright: rotating one turns only the box around it.
Cut, copy, paste and duplicate #
Copy and paste work as in any program: copy the selection, then paste copies of it. Duplicate makes a copy in one step, slightly offset from the original.
| Command | Shortcut | What it does |
|---|---|---|
| Cut | Ctrl+X |
Copies the selection and deletes it. |
| Copy | Ctrl+C |
Copies the selection. |
| Paste | Ctrl+V |
Pastes the copies at the same position as the originals. |
| Paste here | right-click menu | Pastes the copies centred on the point you right-clicked. |
| Duplicate | Ctrl+D |
Copies the selection 5 mm to the right and down. |
| Delete | Del |
Deletes the selection. |
If you copied something in another program since (files, an image, or an SVG or DXF drawing), Paste brings that in instead. See Pasting from other programs.
Cut #
Cut (Ctrl+X) copies the selected vectors and then deletes them, ready to paste somewhere else. The toolbar, the Edit menu and the right-click menu all have it.
Copy #
Copy (Ctrl+C) remembers copies of the selected vectors, with their groups and text, so you can paste them. The originals stay where they are.
Paste here #
Paste here (in the right-click menu) pastes what you copied centred on the point you right-clicked, instead of at the original position. It is greyed out while there is nothing to paste.
Duplicate #
Duplicate (Ctrl+D) copies the selection in one step and selects the copies, 5 mm to the right of and below the originals. It does not touch the clipboard.
Delete #
Delete removes the selected vectors. Like any change, it can be undone with Ctrl+Z.
The Del key does the same in the views. With no vectors selected, Del in the 2D view deletes the selected 3D components instead (the toolbar button and Edit > Delete work on vectors only; use Delete in a component's right-click menu).
Node editing #
Node editing lets you reshape a vector by moving the points (nodes) it is built from and the handles that bend its curves. Press N, click Node Edit in the Edit Objects section, or choose Vectors > Node Edit; press N again to go back to Select mode.
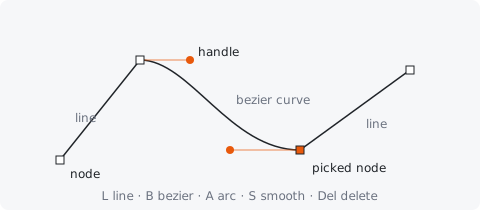
The nodes of the selected vectors appear as small white squares; the node you picked is highlighted. Curves (beziers) show their handles as round dots on thin lines. Click a vector to select it (hold Shift to add more).
| To | Do this |
|---|---|
| Move a node | Drag it. Its handles travel with it. Nodes snap like any other point. Hold Shift to keep it on a horizontal, vertical or 45 degree line through where it was, as when moving a selection (guide lines show the direction). This works on handles too. |
| Bend a curve | Drag a handle. The handle on the other side of the node turns with it so the curve stays smooth; hold Alt to move one handle on its own and make a corner. |
| Add a node | Double-click on a segment. The shape does not change. |
| Delete a node | Click it and press Del. A vector keeps at least two nodes. |
| Make a segment straight | Click the node at its start and press L. |
| Make a segment a curve | Click the node at its start and press B. |
| Make a segment an arc | Click the node at its start and press A. Press A again to bend the arc the other way. |
| Smooth a node | Click it and press S: its two handles line up and pull equally. |
Node editing hints #
While you node edit, a card in the bottom-right corner of the view lists the mouse actions and keys. The keys that work on a picked node are greyed out until you click one. Turn the card off or on with Show Node Editing Hints in the right-click menu, or in Preferences.
Node editing menu #
Right-click a node to pick it and open a menu with the same commands as the keys: Delete Node, Make Line, Make Curve, Make Arc (Flip Arc when the segment is already an arc) and Smooth Node. Right-click on a segment between nodes for Insert Node Here. Done Editing Nodes goes back to Select mode.
Node editing works on plain vectors. To node-edit text, use Text to Vectors first; to node-edit a vector inside a group, ungroup it.
Transform Vectors #
The Transform Vectors section has the forms for moving, scaling, rotating, mirroring, aligning, nesting and copying the selection with exact values. The same forms are in the Vectors menu and the right-click menu.
Move #
Moves the selection to an exact position, or by an exact distance.
Absolute and Relative #
Absolute moves the selection so the point chosen on the Anchor grid lands at X, Y (measured from the job origin). Relative moves the selection by X along X and Y along Y from where it is now.
The form shows the selection's current size. Click Apply to move it; you can click Apply again to repeat a relative move.
Scale #
Changes the size of the selection, to an exact size or by a percentage.
Size and Percent #
With Size, Width and Height are the new size of the selection in the job's units (they start at its current size). With Percent, they are percentages of the current size: 200% doubles it, 50% halves it.
Link X and Y #
Keeps the proportions: changing the width changes the height to match, and the other way round. Untick it to stretch the selection in one direction.
The Anchor grid chooses the point of the selection that stays where it is, for example the bottom-left corner or the centre.
Rotate #
Turns the selection by an exact angle about a pivot point.
Angle #
The angle to turn, in degrees. Positive angles turn anticlockwise, negative ones clockwise. The -90° and +90° buttons fill in a quarter turn.
Pivot #
The Pivot grid picks the point of the selection's box that the selection turns about: a corner, the middle of a side, or the centre.
Mirror #
Flips the selection to make a mirror image of it. Choose the kind of flip and click Apply.
Flip horizontally #
Flip horizontally (about selection) swaps left and right, in place. Flip vertically (about selection) swaps top and bottom, in place.
Mirror about material centre #
Mirror about material centre X flips the selection left to right about the vertical centre line of the material, so it moves to the opposite side. Mirror about material centre Y flips it top to bottom about the horizontal centre line.
Align #
Lines up the selected objects with the material, or with one of the selected objects. Each button acts at once. (In the Text form, Align instead sets whether lines of text are left, centre or right aligned: see Text.)
- To material: Centre, Centre horizontally, Centre vertically, Left, Right, Top or Bottom moves each selected object to that place on the material. With several objects, each is aligned on its own (so Left lines up all their left edges with the material's left edge).
- To last selected object: with two or more objects selected, Centre, Left, Right, Top and Bottom line the others up with one of them. Carvio lines them up with the object you selected last (the last one you
Shift-clicked).
Nest #
Arranges the selected parts on the material so they fit without overlapping, using as little of the sheet as it can. Use it to fit many parts onto one board, or to fill a shape with parts.
A part is a group, or a closed vector together with everything drawn inside it or across it: a letter keeps its hole, a cabinet side keeps its shelf-pin holes and the text engraved on it. Parts are placed largest first, from the corner you choose. Open vectors take the space of a thin outline, and images the space of their box. The status bar reports how many parts fitted and how much of the sheet they use.
In a double-sided job the other side's vectors that lie under a part (through the flip) move with it, mirrored the way the material is flipped, so what is cut from below stays matched with what is cut from above. Select the side with the cut-out outlines and nest from there.
The whole nest is one step on the undo stack (Ctrl+Z puts every part back, on every sheet).
Tool diameter #
The diameter of the cutter that will profile the parts. Parts are kept at least this far apart, plus the clearance, so the cutter always has room to pass between them.
Clearance #
Extra space between parts beyond the tool diameter. A little clearance keeps the thin walls between parts from breaking out.
Border gap #
The gap kept clear around the edge of the material, or inside the vector the parts are nested into.
Rotation #
Which turns Carvio may try for each part to make it fit: None, 0 / 180°, 0 / 90 / 180 / 270°, or every 45°, 30°, 15° or 5°. Finer steps can pack odd shapes tighter but take longer. Choose None or 0 / 180° when the grain direction matters.
Mirror parts #
Lets a part be flipped over if its mirror image fits better. Leave it off when the parts have a right way round: a mirrored part is cut in the other direction, and its engraving comes out backwards.
Allow parts inside other parts #
Lets small parts go into the holes of larger ones, such as the inside of a frame or the hole of a ring. Untick it when the holes are pockets rather than cut-outs, or when the inner pieces would fall through and jam.
Nest from #
The corner of the sheet the nest starts from: Bottom left, Bottom right, Top left or Top right. The parts pour out of that corner, so any space left over is at the opposite corner, where an offcut is easiest to keep.
Direction #
Along X fills a row along the bottom (or top) edge first, then the next row up; Along Y fills a column up the side first, then the next column across. Fill along the long side of a board to leave the offcut as one strip.
Nest into #
The material nests the parts onto the material sheet. Last selected vector nests them inside the vector you selected last (Shift-click it last): any closed shape works, and its holes are kept clear. Select the parts first, then the vector. The vector itself stays where it is.
When not every part fits, the parts that do are shown in place and Carvio asks whether to Fit those (keeping them there, the others where they were) or Cancel, which puts everything back.
Parts that do not fit go to new sheets #
When the parts do not all fit, the rest go onto a new material sheet, which is nested in turn, and so on until every part has a place. Without it, Carvio asks whether to keep the parts that fit where they are and leave the others where they were.
Optimize #
How long the nest goes on improving: Until stopped, 10 s, 30 s or 2 min. From the moment you press Nest the parts are placed one by one, largest first, then shuffled about: each move takes out a patch of parts (a part and its neighbours, or the parts standing highest) and fits them in again elsewhere, keeping the new layout when the nest is no worse (fewer sheets, a shorter strip of the sheet, parts lying lower). Many parts can shift at once, so you see different fits being tried. You watch it happen in the 2D view, and Carvio stays usable meanwhile. Stop keeps the best layout found so far; Cancel puts every part back. The nest also ends by itself when its time is up.
Array #
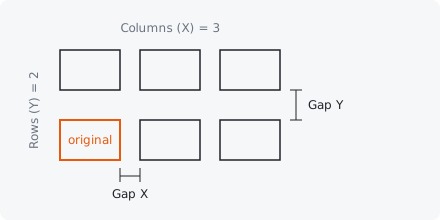
Copies the selection in a grid of rows and columns. The original stays where it is, at the bottom left of the grid; the copies go to the right and upwards.
Columns #
Columns (X) is how many copies there are across, counting the original.
Rows #
Rows (Y) is how many copies there are upwards, counting the original.
Gap X and Gap Y #
The space between neighbouring copies, from the edge of one to the edge of the next. 0 puts them edge to edge; a negative gap makes them overlap.
Circular #
Copies the selection around a centre point, like the spokes of a wheel or holes around a flange.
Copies #
How many objects there are in the ring, counting the original.
Total angle #
The angle the copies are spread over. Each copy is turned Total angle divided by Copies further than the one before, so 360° with 6 copies puts one every 60° all the way round.
Centre X and Centre Y #
The point the copies are arranged around. Use material centre fills in the centre of the material.
Rotate copies #
Turns each copy as it goes round, so it always faces the centre the same way, like spokes. Untick it to keep every copy upright and only move it.
Edit Objects #
The Edit Objects section has the commands that change the shape of vectors: node editing, offset, join, fillet, weld, subtract, intersect, close, group, ungroup, text to vectors and reverse.
Offset #
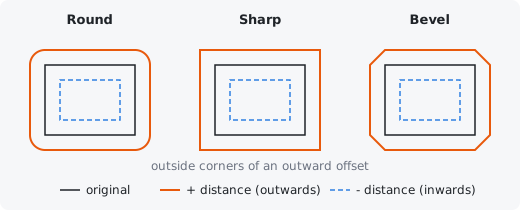
Makes a new vector a set distance outside or inside the selected vectors, like an outline around a shape. Closed vectors offset outwards for a positive Distance and inwards for a negative one; open vectors offset to the right (positive) or left (negative) of their direction.
Distance #
How far the new vector lies from the original, in the job's units. Positive is outwards (or to the right of an open vector), negative is inwards (or to the left).
Corners #
What happens at the outside corners of an outward offset. Round rounds them, as a round cutter would. Sharp keeps them pointed (very sharp ones are cut short). Bevel cuts them straight across.
Keep original #
Keeps the original vectors as well as the offset. Untick it to replace them with the offset.
Join #
Joins open vectors whose ends meet into one vector. If the joined vector's two ends meet, it is closed.
Ends must be within 0.05 mm of each other to join. This tidies up drawings imported as many loose lines, for example from DXF files, so they can be pocketed or carved.
Fillet #
Rounds the sharp corners of the selected vectors with arcs of the given Radius.
Only corners between two straight segments are rounded; corners next to a curve or an arc, and the two ends of an open vector, stay as they are. A radius too big for a corner is made smaller to fit (at most half the shorter of the two sides).
Weld #
Merges the selected closed vectors into one outline where they overlap, as if they were cut from one piece.
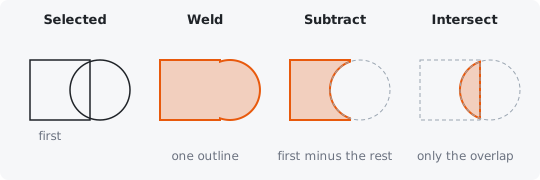
Weld, Subtract and Intersect use only closed vectors. The result replaces all the selected objects, so leave open vectors out of the selection. Text is welded as outlines, and is no longer editable as text afterwards.
Subtract #
Cuts the other selected closed vectors out of the one you selected first: select the shape to cut from, then hold Shift and click the shapes to take away.
Select at least two objects. When several are selected at once (with a selection box or Select All), the one earliest in the drawing order counts as selected first.
Intersect #
Keeps only the area where the selected closed vectors overlap: where the one you selected first overlaps the others.
Close #
Closes the selected open vectors by joining each one's end to its start with a straight line. A vector needs at least three nodes to be closed, and open vectors inside groups are closed too.
Group and Ungroup #
Group (Ctrl+G) joins the selected objects into one group, so they select, move and scale together. Ungroup (Ctrl+U) breaks the selected groups back into their parts.
Select at least two objects to group them. Groups can hold other groups.
Reverse #
Reverses the direction of the selected vectors: the end becomes the start. The direction matters for open vectors (where a cut starts, which side an offset goes, which way text on a curve runs).
Vector Properties #
The Vector Properties section appears while vectors are selected. It shows how many are selected and their size, and lets you set their layer, size and position exactly.
Layer #
The layer the selected vectors are on. Pick another layer to move them there. See The Layers tab.
Keep proportions #
With Keep proportions ticked, Apply size scales the selection evenly, using whichever of Width and Height you changed. Untick it to set the width and height separately. The selection is scaled about its centre.
Apply position #
Moves the selection so its lower-left corner is at X, Y, measured from the job origin.
The Layers tab #
Layers sort the parts of your design, for example cut-outs on one layer, carving on another and notes on a third. Hide a layer to get it out of the way, or lock it so you cannot select it by mistake.
The Layers tab has three sections: Sheets (see Material sheets), Layers and Layer Properties.
Layers #
The list of the job's layers. Each row has a round button, an eye, a lock and the layer's name, with how many vectors and 3D components it holds.
- The round button makes that layer the active one: new vectors, imports and clips go onto it.
- Click a layer's name to choose it for Layer Properties.
- To add a layer, type a name in the box under the list and click Add. With no name it is called Layer 2, Layer 3 and so on. The new layer becomes the active one.
Every job starts with Layer 1.
Visible #
The eye shows or hides the layer. Hidden vectors and components are not drawn and cannot be selected; anything selected on the layer is deselected when you hide it.
Locked #
The lock stops the layer's vectors from being selected, so you cannot move or change them by accident. They are still drawn, and toolpaths you already made from them are kept.
Add #
Adds a new layer with the name in the box beside the button and makes it the active layer.
Layer Properties #
The settings of the layer you clicked in the list. Type in Rename to change its name, and click a Colour swatch to choose the colour its vectors are drawn in. (In the Sheets section, Rename renames the chosen sheet.)
Colour #
The colour the layer's vectors are drawn in, from eight swatches. It is only for the screen; it does not change the toolpaths.
Move selection here #
Moves the selected vectors and 3D components onto this layer. (In the Sheets section, it moves the selected vectors to the chosen sheet.) You can also change the layer of the selection in Vector Properties.
Delete layer #
Deletes the layer. Its vectors move to another layer (the first one, or the second if you delete the first), so nothing is lost. A job always keeps at least one layer.