
The Carvio Window #
This chapter is a tour of the Carvio window: the menus and toolbar, the side panels with their tabs, the 2D and 3D views and the status bar. It also explains how to move around the views, select things, use guide lines and snapping, and undo mistakes.
Window layout #
The Carvio window has a menu bar and a toolbar across the top, side panels on the left and right, the views in the middle and a status bar along the bottom.
| Part | What it holds |
|---|---|
| Menu bar | File, Edit, View, Vectors, Model, Toolpaths, Machine and Help. |
| Toolbar | One-click buttons for the commands you use most. |
| Left panel | The Drawing, Modeling, Layers and Clipart tabs. |
| Right panel | The Toolpaths, Machine, Run and Console tabs. |
| Views | The 2D View and 3D View tabs (and a Machine tab while a machine is connected). |
| Status bar | The cursor position, the current mode and job size, and messages. |
You can rearrange the panels: see Arranging the panels.
The menus #
The menus hold every command in Carvio, grouped by the step of the work they belong to. Many of them have a keyboard shortcut, shown beside the command.
| Menu | What is in it |
|---|---|
| File | New job, open and save projects, import and export, save toolpaths, project notes, setup sheets, recent files and exit. See File menu. |
| Edit | Undo and redo, cut, copy, paste, duplicate, delete, select all, Job Setup..., Preferences... and the theme. |
| View | 2D or 3D view, zooming, grid, snapping and rulers, what each view shows, the panels and the 3D camera directions. |
| Vectors | The drawing tools and the commands that change vectors. See Drawing vectors and Editing vectors. |
| Model | 3D modeling: shapes from vectors, sweeps, extrusions, sculpting, images and 3D models. |
| Toolpaths | Every toolpath operation, the Tool and Material databases, preview, recalculation and saving G-code. |
| Machine | Connecting to a machine, machine setup, homing, jogging and running jobs. |
| Help | This manual, printing it, and About Carvio. |
The toolbar #
The toolbar under the menus has buttons for the most common commands. Rest the pointer on a button to see what it does. Thin vertical rules separate the groups of buttons, and you can rearrange the toolbar to suit you.
From left to right the buttons start out as:
- New job, Open, Save
- Undo, Redo
- Cut, Copy, Paste, Delete
- Select and Node edit (the two editing modes)
- Zoom in, Zoom out, Zoom extents
- Grid, Snap to grid, Rulers (they look pressed in while they are on)
- 2D view, 3D view, then Top view, Isometric, Front view and Side view for the 3D camera
- Preview toolpaths, Save toolpaths, Setup and tool sheets, Tool Database
- The machine button: Machine view while a machine is connected, otherwise it opens the Machine tab so you can connect.
Two more groups appear only when they are needed:
- In a double-sided job, two buttons choose whether you edit the top side or the bottom side.
- When the job has more than one material sheet, a list shows which sheet you are editing.
Most toolbar buttons are described with the command they run: Open, Save, Undo and redo, Cut, copy, paste and duplicate, Node editing, Zooming, Grid and snapping, Rulers, Camera directions, Preview, Save Toolpaths and Setup and Tool Sheets.
Rearranging the toolbar #
Drag a toolbar button left or right to move it: a line shows where it will go. Drag it down off the toolbar to hide it. Right-click the toolbar for a menu that hides buttons, adds separators and brings hidden buttons back. Your layout is kept in your preferences.
The right-click menu lists every toolbar button; the ones on the toolbar are ticked. Click a ticked button to hide it, or an unticked one to put it back at the right-hand end of the toolbar. The separator rules can be dragged like buttons.
Hide Button #
Takes the button you right-clicked off the toolbar. It stays in the right-click menu, unticked; click it there to bring it back at the end of the toolbar.
Insert Separator #
Adds a separator rule to the toolbar where you right-clicked, between the two buttons nearest the pointer. Drag it to move it.
Remove Separator #
Takes the separator rule you right-clicked off the toolbar.
Reset Toolbar #
Puts the toolbar back the way Carvio comes: every button shown, in the standard order, with the standard separators.
Select mode #
Select is the normal editing mode: click a vector or a component to pick it, drag a box to pick several, and drag the selection's handles to move, scale or rotate it. The button looks pressed in while Select mode is on.
Clicking Select also stops node editing. To put a drawing tool away as well, use Select on the Drawing tab or press Esc. See Selecting objects and Moving, scaling and rotating with the mouse.
Machine button #
While a machine is connected, this button switches to the Machine view (F7). While no machine is connected, it opens the Machine tab, where you connect. See Machine control.
Top side and bottom side #
In a double-sided job, these two toolbar buttons choose which side of the material you are editing: the top side, or the bottom side shown as it will look after the flip. F6 (Vectors > Switch Side, or Switch Side when you right-click) swaps between them.
Each side has its own vectors, 3D model and toolpaths; the status bar shows Side: Top or Side: Bottom. See Double sided.
The side panels and tabs #
The side panels hold the tabs where you do most of your work. Each tab is a column of sections; click a section's heading to fold it up or open it again.
| Tab | Use it to |
|---|---|
| Drawing | Open, save and import files, control the 2D view, draw vectors, and move, size and edit them. |
| Modeling | Create, arrange and edit 3D components. |
| Layers | Manage material sheets and layers: what is shown, locked and where new vectors go. See The Layers tab. |
| Clipart | Browse and search the clipart library and add clips to the job. See The clipart library. |
| Toolpaths | Material setup, the toolpath operations and the list of toolpaths. |
| Machine | Connect to a machine, jog it, control the spindle, probe and run macros. |
| Run | Load and run a job on the machine. |
| Console | See and type the commands sent to and from the controller. |
When you pick a tool or a command, its form (its list of options) opens in place of the tab's sections. Click Close at the bottom of the form, or press Esc, to return to the sections.
Tip: When you click a vector Carvio shows the Drawing tab, and when you click a 3D component it shows the Modeling tab. If you prefer the tab to stay put, turn off Switch tab to the picked object in Edit > Preferences....
Arranging the panels #
You can move tabs and sections around to suit the way you work. Carvio remembers the layout the next time it starts.
- Move a tab: drag its name to another place in a tab strip, to the top or bottom of a panel (to stack it as a new group), or to the other side of the window.
- Resize: drag the edge between a panel and the views. When a side has two groups of tabs, drag the gap between them.
- Fold a side away: click the small arrow at the top of a panel. A thin strip stays; click its arrow to open the panel again. View > Left Panel and View > Right Panel do the same.
- Move a section: drag a section heading onto another tab's name, or to another place in a tab.
Right-click a tab or an empty part of a panel for the tab commands below, and right-click a section heading for the section commands. A menu that lists more tabs or sections than fit has More tabs / More sections and Previous tabs / Previous sections at the bottom to page through them; Back returns to the first page.
Folding a panel away #
The small arrow at the top of a side panel (Collapse panel) folds that side away to a thin strip, giving the views more room. Click the arrow on the strip (Show panel) to open it again.
View > Left Panel and View > Right Panel do the same; a tick shows the panel is open. Picking a tool or a command that lives on a folded panel opens it again.
New tab #
New tab adds an empty tab of your own beside the one you right-clicked, and lets you type its name straight away. Drag sections into it, or use Move to tab... on a section.
View > New workspace tab adds one next to the Drawing tab.
Rename tab #
Rename tab puts a Tab name box at the top of the tab. Type the new name and press Enter (or click the tick) to keep it; press Escape (or click the cross) to leave the name as it was.
Remove tab #
Remove tab... takes the tab away. Carvio first asks which other tab is to keep its sections, so no tool is ever lost. There is always at least one tab left.
Move tab to the other side #
Move tab to right side (or Move tab to left side) moves the tab to the panel on the other side of the window, at the end of its last group of tabs.
Expand and collapse all sections #
Expand all sections opens every section of the tab; Collapse all sections folds them all up to their headings, so you can see what the tab holds at a glance.
Hide section #
Hide section takes the section off its tab, so the tabs show only the tools you use. It stays hidden the next time Carvio starts. Bring it back with Hidden sections..., or with Reset to Default View.
A command that needs a hidden section brings it back by itself: Machine > Machine Panel, Run Panel and Console, building or opening a job to run, and adding a file to the clipart library. The section goes back to the place it was hidden from (or to its own tab if that tab was removed since), opens, and its tab scrolls to it; the status bar says so.
Hidden sections #
Hidden sections... lists the sections that are no longer on any tab (hidden ones, and any that were lost) and brings one back. From a tab's menu, the section you pick is added to that tab; from View > Hidden sections... you then choose the tab it goes to (Restore section to:), or a new tab.
The command is greyed out while every section is on a tab.
Reset to Default View #
Reset to Default View puts every tab and section back where they were when Carvio was new: the tabs you made are removed, both panels open at their first widths and the 2D view zooms to fit. It is in the View menu too.
Moving a section #
Drag a section's heading to move it: drop it on another tab's name (hold it there a moment to open that tab), or between the sections of a tab. Right-click the heading for these commands:
| Command | What it does |
|---|---|
| Move up / Move down | Moves the section one place up or down its tab. |
| Move to tab... | Lists the other tabs; pick one to move the section to the end of it. |
| Move to new tab | Makes a new tab with this section on it, and asks for the tab's name. |
| Hide section | Takes the section off its tab (see Hide section). |
Commands that open a tab follow its main section: if you move Run to a tab of your own, Machine > Run Panel opens that tab. Forms (a tool's options) open on the tab that holds the tools they come from, such as Create Vectors for the drawing tools and Toolpath Operations for the toolpaths.
Collapse section #
Collapse section folds the section up to its heading, and Expand section opens it again; clicking the heading does the same. Collapse others folds every other section of the tab and leaves this one open.
The 2D view #
The 2D view shows your design from above, on the material, as it will be cut. It is where you draw and edit vectors.
The material is the white rectangle. The red cross marks the job origin, X 0 Y 0, which sits where you put the XY datum. Vectors are drawn in the colour of their layer; selected vectors turn pink and dashed. An open vector has a small square at its start point.
The 2D view can also show the toolpaths (View > Toolpaths in 2D view) and a shaded picture of the 3D components (View > Components in 2D view).
Moving around in 2D #
Zoom with the mouse wheel and pan by dragging with the middle or right mouse button. The view zooms towards the point under the pointer.
| To | Do this |
|---|---|
| Zoom in or out | Turn the mouse wheel, or use Zoom in / Zoom out on the toolbar. |
| Pan | Drag with the middle or right mouse button, or hold Space and drag with the left button. |
| See everything | Press F or choose View > Zoom Extents. |
| See the whole material | View > Zoom to Material. |
| See the selection | View > Zoom to Selection. |
The 2D View Control section of the Drawing tab has the same zoom commands, plus the grid, snapping and ruler switches.
Zooming #
The zoom commands are on the toolbar, in the View menu, on the Drawing tab and in the right-click menu of an empty spot.
Zoom in and Zoom out #
The Zoom in and Zoom out toolbar buttons zoom about the middle of the view, a quarter closer or further each click. In the 3D view they move the camera towards or away from what it looks at.
The mouse wheel does the same, zooming towards the pointer instead.
Zoom Extents #
Zoom Extents (F) fits the view to everything: in the 2D view the material and every vector, also those outside the material; in the 3D view the material block.
Zoom to Material #
Zoom to Material fits the 2D view to the material, ignoring anything drawn outside it.
It always works on the 2D view, also while the 3D view is showing.
Zoom to Selection #
Zoom to Selection zooms the 2D view in on the selected vectors, with a small margin around them. Nothing happens when nothing is selected.
From the View menu it always works on the 2D view; in the 3D view's right-click menu it fits the material block instead.
The 3D view #
The 3D view shows the material block, the 3D model, the vectors on the material surface and the toolpaths in 3D. Toolpath previews play here too.
Press F2 for the 2D view and F3 for the 3D view, or click the 2D View and 3D View tabs above the views.
Moving around in 3D #
Drag with the left mouse button to orbit, with the middle or right button to pan, and turn the wheel to zoom. The camera orbits about the point under the pointer.
| To | Do this |
|---|---|
| Orbit | Drag with the left button on an empty spot or on the bare model. |
| Pan | Drag with the middle or right button. |
| Zoom | Turn the mouse wheel; it zooms towards the pointer. |
| Fit everything | Double-click with the left button, or press F. |
| Look from a side | Top, Isometric, Front or Side in the View menu or on the toolbar. |
| Switch perspective | View > Orthographic turns perspective off and on. |
Camera directions #
Top, Isometric, Front and Side turn the camera to look at the job from a set direction. They work in the 3D view and in the Machine view, which share the same camera, and keep you in whichever of the two you are in. From the 2D view they switch to the 3D view. They are on the toolbar, in the View menu and in the right-click menu of an empty spot in the 3D view. After turning the camera you can orbit freely again.
Top view #
Looks straight down on the job, with X to the right and Y up, like the 2D view. From the 2D view it switches to the 3D view; in the Machine view it stays there.
Isometric #
Looks down at an angle from above the front-left corner, so the top, front and left side of the material all show. From the 2D view it switches to the 3D view; in the Machine view it stays there.
Front view #
Looks level at the front edge of the job (from the -Y side), to check depths and heights along X. From the 2D view it switches to the 3D view; in the Machine view it stays there.
Side view #
Looks level at the right-hand edge of the job (from the +X side), to check depths and heights along Y. From the 2D view it switches to the 3D view; in the Machine view it stays there.
Orthographic #
View > Orthographic draws the 3D view without perspective, so parallel edges stay parallel and sizes do not shrink with distance. Choose it again to go back to perspective.
It is handy with the Top, Front and Side directions, to compare heights and line things up by eye.
When a drawing tool is active, a left drag in the 3D view draws on the material surface instead; hold Alt to orbit.
You can select, move and node-edit vectors in the 3D view as well, on the material surface. To keep the 3D view uncluttered, turn off View > Vectors in 3D view, Toolpaths in 3D view or Material block in 3D.
What the views show #
The View menu has switches for what the 2D, 3D and Machine views draw. A tick shows which are on. They only change the picture, never the job.
Toolpaths in 2D view #
Draws the toolpaths over the design in the 2D view. It is the same switch as Show in 2D under the Toolpath List. It is on each time Carvio starts.
Toolpaths in 3D view #
Draws the toolpath lines in the 3D view and in the toolpath preview. Carvio remembers this setting.
Toolpaths in Machine view #
Draws the lines of the job's toolpaths in the Machine view while a machine is connected. The same setting is in Edit > Preferences... and on the Run tab. Carvio remembers it.
Tool in Preview #
Shows a model of the tool at the point it is cutting while a toolpath preview plays, as in the Machine view. The same setting is in the preview form and in Edit > Preferences....
Vectors in 3D view #
Draws the vectors on the material surface in the 3D view. Turn it off for an uncluttered look at the model and the toolpaths; vectors can then not be picked in the 3D view.
Components in 2D view #
Draws the 3D components as shaded pictures in the 2D view, where they can be clicked and boxed to select them. Turn it off to see and pick only the vectors.
Material block in 3D #
Draws the block of material in the 3D view. Turn it off to see the 3D model and the toolpaths on their own. It is on each time Carvio starts.
3D Debug Info #
Shows technical details over the view: the graphics card and OpenGL version, what draws the windows (on Linux: Wayland, X11, or XWayland with the reason Wayland was not used), the frame rate and the time each part of the window takes to draw, and counts of what is drawn. It is meant for reporting display problems. Ctrl+Shift+D turns it on and off.
The status bar #
The status bar along the bottom shows where the pointer is, what mode you are in, the job size, and the latest message from Carvio.
- X / Y: the pointer's position measured from the job origin. In the 3D view it also shows Z: the height of the model, stock or toolpath under the pointer, handy for checking a depth by eye.
- Mode: the current tool (Select, Node Edit, Rectangle...), the job's size, and the side and sheet you are editing.
- Messages: what the last command did, such as "Saved", "Imported 12 vectors" or a measured distance.
- Busy indicator: on the right while Carvio is loading, importing or calculating. The window stays usable while it works.
While a machine is connected, its state and position are shown there too.
Selecting objects #
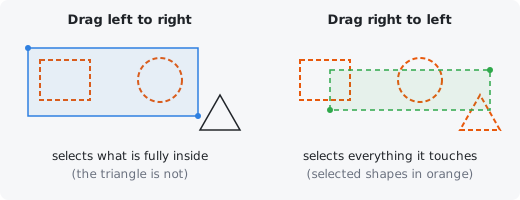
Click a vector to select it, or drag a box around several. Most commands work on whatever is selected.
| To | Do this |
|---|---|
| Select one object | Click its outline (an image: click anywhere inside it). |
| Add or remove an object | Hold Shift and click it. |
| Select everything inside a box | Drag from left to right. The box is solid and blue, and only objects that lie completely inside it are selected. |
| Select everything the box touches | Drag from right to left. The box is dashed and green. |
| Select all | Ctrl+A (Edit > Select All). |
| Deselect | Esc, or click an empty spot. |
Objects on hidden or locked layers cannot be selected. 3D components can be clicked and boxed in the 2D view too, while Components in 2D view is on.
Esc steps back one thing at a time: it first drops a drawing in progress, then puts the drawing tool away and closes its form, then clears the selection.
Select All #
Edit > Select All (Ctrl+A) selects every vector on the layers you can see and that are not locked, on the side and sheet you are editing.
Deselect #
Edit > Deselect (Esc) clears the selection, so nothing is selected. Clicking an empty spot in Select mode does the same.
Right-click menus #
Right-click in a view for a menu of the commands that fit what is under the pointer. A right-click that turns into a drag pans the view instead.
- On a vector: cut, copy, Paste here, duplicate, delete, Edit Text... (on a text), Node Edit, group, the transform forms, Weld and Subtract, Trace Image... (on an image), quick ways to start a Profile, Pocket, V-Carve or Laser Cut toolpath, Create Shape from Vectors..., Export as Clipart..., Form Tool from Vector... and Zoom to Selection. If the vector under the pointer is not selected, it is selected first.
- While node editing: the commands for the node or segment under the pointer, such as Delete Node, Make Curve and Insert Node Here. See Node editing menu.
- On a 3D component: size, move, align, rotate, mirror, group, bake, smooth, sculpt, boundary vectors, cut by vectors, export and delete.
- On an empty spot: Paste here, Paste, Select All, zooming, the grid, snapping and ruler switches, guide lines, and Job Setup....
In a double-sided job the menu also has Switch Side (and Copy to Other Side for vectors). With several sheets it has Next Sheet, and for vectors Move to each other sheet.
Rulers and guide lines #
The rulers along the top and left of the 2D view measure in the job's units from the job origin. Drag out of a ruler to place a guide line: a straight line across the view that you can snap to.
Turn the rulers on or off with View > Rulers, the Rulers button on the toolbar, or the Rulers button in the Drawing tab.
| To | Do this |
|---|---|
| Add a horizontal guide | Drag down out of the top ruler. |
| Add a vertical guide | Drag right out of the left ruler. |
| Add a guide at a ruler mark | Right-click the ruler and choose Add vertical line at X ... or Add horizontal line at Y .... |
| Place a guide exactly | Right-click a ruler or an empty spot and choose Create vertical line... or Create horizontal line..., then type the position. |
| Move a guide | In Select mode, drag the guide. The status bar shows its position. |
| Edit a guide | Right-click it and choose Edit line.... |
| Delete a guide | Drag it back onto its ruler, or right-click it and choose Delete 1 line. |
| Delete all guides | Right-click a ruler or an empty spot and choose Delete all lines / Delete all guide lines. |
While you drag a guide it snaps to the grid when grid snapping is on; hold Ctrl to switch that the other way. Vertical guides are tinted green and horizontal guides red, like the Y and X axes. Guides are saved with the project and can be undone like any other change.
Placing a guide line exactly #
Create vertical line... and Create horizontal line... (right-click a ruler or an empty spot) open a small window to place a guide at a typed position. Edit line... (right-click a guide) opens the same window for that guide.
Choose Vertical or Horizontal, type the X position (or Y position) measured from the job origin, and click Create (or OK). When editing, Delete removes the guide.
The position starts at the point you right-clicked, rounded like a ruler mark.
Deleting guide lines #
Delete all lines (right-click a ruler) and Delete all guide lines (right-click an empty spot of the 2D view) remove every guide line of the job in one go. Like any change, it can be undone.
To delete just the guides under the pointer, right-click them and choose Delete 1 line (or Delete 2 lines, and so on, where several lie on top of each other).
Grid and snapping #
The grid helps you line things up, and snapping pulls the pointer onto grid points, the corners and middles of shapes and guide lines while you draw and move.
| Switch | Where | What it does |
|---|---|---|
| Show Grid | View menu, Grid on the toolbar and Drawing tab | Shows grid lines over the material. They adjust to the zoom so they stay readable. |
| Snap to Grid | View menu, Snap to grid on the toolbar, Snap Grid on the Drawing tab | Rounds points to the Grid spacing. |
| Snap to Objects | View menu, Snap Objects on the Drawing tab | Snaps to the nodes, segment midpoints, centres and crossing points of nearby vectors, the corners and centre of the material, the origin, and guide lines. |
When a point snaps, a small green circle shows where. Snapping to objects wins over the grid when both are on.
Show Grid #
Show Grid (the Grid button on the toolbar) shows or hides the grid lines over the material in the 2D view. The button looks pressed in while the grid is shown.
The grid is only a guide for the eye; whether points snap to it is set by Snap to Grid.
Snap to Grid #
Snap to Grid rounds the points you draw and the moves you make to the Grid spacing, whether the grid is shown or not. Hold Ctrl while dragging to swap it for that drag.
Snap to Objects #
Snap to Objects pulls the pointer onto nearby nodes, segment midpoints, centres and crossing points of vectors, the material's corners and centre, the origin and guide lines while you draw and move.
When you drag a selection, hold Ctrl to turn grid snapping off (or on) for that drag, and hold Shift to lock the move to horizontal, vertical or 45 degrees.
Grid spacing #
Grid spacing in the Drawing tab's 2D View Control section sets the step that Snap to Grid rounds to and that the arrow keys nudge the selection by. It is the same setting as Grid spacing in Edit > Preferences... (see Preferences).
The grid lines you see are spaced to suit the zoom, on whole units of the job; the snapping step is always the Grid spacing.
Nudging with the arrow keys #
With vectors (or components) selected, the arrow keys move them by the grid spacing. Hold Shift to move ten times as far, or Alt to move a tenth as far.
Typing numbers and formulas #
Every number field in Carvio accepts simple arithmetic and units, so you can type 300/3, 1in or 3/8" and let Carvio work it out. The value is shown in the job's units.
| You type | You get |
|---|---|
10+2.5 |
12.5 |
(3*4)/2 |
6 |
1in, 25.4mm, 3/8", 2ft, 1m |
Converted to the job's units |
20+10% |
22 |
x, y, z |
The material's width, height and thickness |
x/2 |
Half the material width |
=+10, =*2, =/2, =-1in |
Changes the value already in the field: adds 10, doubles it, halves it, takes an inch off |
While a field has the focus, the up and down arrow keys step its value (Shift for ten steps, Ctrl for a tenth).
Undo and redo #
Undo takes back your last change, and redo puts it back. Carvio remembers the last 100 changes to your vectors and model.
| Command | Shortcut | Where |
|---|---|---|
| Undo | Ctrl+Z |
Edit > Undo, toolbar |
| Redo | Ctrl+Y or Ctrl+Shift+Z |
Edit > Redo, toolbar |
The Edit menu names the change it will undo or redo, for example Undo Move or Redo Weld. Undo covers vectors, guide lines, layers, sheets, the job setup and the 3D model; changes to vectors and to the model are undone in the order you made them.
Light and dark theme #
Carvio has a light and a dark look. Choose Edit > Light Theme, Edit > Dark Theme or Edit > Follow System Theme.
Follow System Theme (the default) switches with your operating system's own light or dark setting. The same choice is in Edit > Preferences... as Theme.
Common keyboard shortcuts #
These shortcuts work anywhere in the main window, except while you are typing in a field. The Keyboard Shortcuts chapter lists them all.
| Keys | Command |
|---|---|
Ctrl+N / Ctrl+O / Ctrl+S |
New job, open, save (Ctrl+Shift+S: save as) |
Ctrl+I |
Import |
Ctrl+Z / Ctrl+Y |
Undo / redo |
Ctrl+X / Ctrl+C / Ctrl+V / Ctrl+D |
Cut, copy, paste, duplicate |
Ctrl+A / Esc / Del |
Select all, deselect (or cancel the tool), delete |
Ctrl+G / Ctrl+U |
Group, ungroup |
N |
Node edit mode on or off |
L / B / A / S / Del (node editing) |
Make the segment a line, a bezier or an arc; smooth the node; delete the node |
F |
Zoom extents |
F1 |
Help |
F2 / F3 |
2D view / 3D view |
F4 |
Job setup |
F6 |
Switch side (double-sided jobs) |
F7 |
Machine view (while connected) |
| Arrow keys | Nudge the selection (Shift x10, Alt x0.1) |
Space + drag |
Pan the 2D view |
Shift while dragging a rectangle or ellipse |
Square or circle |
Alt while dragging a rectangle or ellipse |
Draw from the centre |
Shift / Ctrl while moving |
Lock to horizontal, vertical or 45 degrees / swap grid snapping |
Enter / Backspace (polyline, bezier) |
Finish / remove the last point |
Ctrl+Shift+D |
3D debug information |