
Previewing Toolpaths #
The preview cuts your toolpaths into a virtual block of material in the 3D view, so you can see the finished part before you go near the machine. It catches most mistakes cheaply: a toolpath on the wrong side of a line, a pocket too deep, a tab missing, a tool too big for a detail.
Open it with the Preview button on the Toolpaths tab, Toolpaths > Preview Toolpaths... or the Preview toolpaths button on the toolbar. The 3D view shows the uncut block at once, with the first toolpath's tool waiting at the home position.
The simulation runs on the graphics card. It shows the true shape of every tool (end mills, ball noses, V-bits, form tools and their undercuts) and colours each cut by its toolpath.
Choosing what to preview #
The list at the top shows the toolpaths of the current sheet. Tick the ones you want in the preview and click one to select it; double-click a toolpath to preview it alone.
| Button | What it simulates |
|---|---|
| Preview Selected | The highlighted toolpath only |
| Preview Visible | Every ticked toolpath, in list order |
| Preview All | Every toolpath in the list, ticked or not |
The preview always starts from a fresh block and runs to the end straight away (you can watch the progress bar move); then you can scrub back through it. A ticked box here is the same as the toolpath's visibility on the Toolpaths tab.
A toolpath whose tool reaches deeper than its flutes next to standing material has a red warning sign in the list. The Preview cuts with that tool's shank as well and paints where it meets the material red (see Shank clearance).
Preview Selected #
Simulates only the toolpath highlighted in the list, on a fresh block. Double-clicking a toolpath in the list does the same.
Preview Visible #
Simulates every ticked toolpath, one after the other in list order, on a fresh block.
Preview All #
Simulates every toolpath in the list, whether it is ticked or not, on a fresh block.
Reset #
Clears the simulation and puts back the uncut block.
Recalculate out of date #
Recalculates the toolpaths whose vectors or model changed since they were made. The preview says how many are out of date; it cuts them as they were last calculated until you recalculate.
Removing offcuts #
When a profile cuts right through the material, the piece it frees and the waste around it are separate pieces of stock. Double-click a piece in the 3D view to take it away, so you can see the part on its own (or the part's outline in the sheet). Pieces still joined by tabs or a thin skin count as one piece and stay together.
The last piece of material always stays: double-clicking it only says so in the status bar. Double-clicking where there is no stock fits the view, as usual.
Removed pieces come back with Reset or a new preview, and when you scrub back to before they were cut free.
Animate and scrub #
Animate plays the cutting back from the start with the tool moving, every rapid included, at the speed set by the slider under the buttons. Pause stops it where it is; Resume carries on.
Once a preview has run, the long slider below the options is both the progress bar and a scrubber. Drag it to any point, forwards or back, and the block shows exactly what is cut up to there. The percentage shows above the knob, and the line under it tells you which segment you are on and what is being previewed.
The slider follows the tool's travel, not the number of moves: a long move takes its fair share of the bar and you can stop part-way along it, so the slider works like a timeline of the job.
Pause #
Stops the animation (or the fast run of a preview) where it is. Click Resume to carry on from there.
Animation speed #
The slider under Pause sets how fast Animate plays, as segments cut per frame (each segment up to a quarter of a millimetre). Move it right for a quick look, left to watch a tricky corner.
Preview options #
The options under the buttons change how the preview looks. They are remembered for next time.
Colour cuts by toolpath #
When ticked, every surface a toolpath cuts is tinted in that toolpath's colour, so you can see which toolpath made which cut. Untick it to see bare material, as the part will look.
Solid stock sides #
When ticked, the sides of the block are solid. Untick it to make them see-through, so you can look at cuts that would otherwise be hidden behind them, such as a profile cut along the edge.
Show toolpaths in 3D view #
Draws the toolpath lines over the block. Turn it off to see the cut surface without the clutter. View > Toolpaths in 3D view does the same.
Show the tool at the cut #
Shows a model of the tool standing where it is cutting while the preview animates or when you scrub, as the Machine view does when a job runs. A laser shows its beam while it burns. View > Tool in Preview does the same.
Stock looks like #
Picks how the block of material looks: woods (pine, oak, maple, walnut, cherry, mahogany), plywood, MDF, plastics and acrylics, stone, metals, foam and solid surface. It only changes the picture, not the cutting.
The choice is kept with the job (it is the same setting as Appearance in Job Setup). Until you pick one, the block looks like the job's material.
Resolution #
How fine the simulated block is: Low (768), Standard (1536), High (2048) or Very high (4096) cells across. Higher shows finer detail, such as small V-carved text, but uses more graphics memory and takes longer.
The setting is shared with Stock resolution in Preferences. Use Low on a modest graphics card or for a quick check of a large job.
Save Image #
Saves a PNG picture of the 3D view as it is now, simulated block and all. Handy for showing a customer what they will get. File > Save Image... does the same.
Estimated machining time #
The bold line at the bottom adds up the estimated time of the ticked toolpaths. It is an estimate from the feed rates and distances: real machines slow down in corners, so expect the job to take somewhat longer.
Tool changes in the preview #
When the next toolpath uses another tool, the preview sends the tool back to the home position first, changes it there and starts the next toolpath from home, just as a job with manual tool changes runs.
Double-sided jobs #
In a double-sided job the preview cuts both sides: the other side's toolpaths first, then it turns the block over and cuts the side you are editing. You end up looking at the part from the side you are working on.
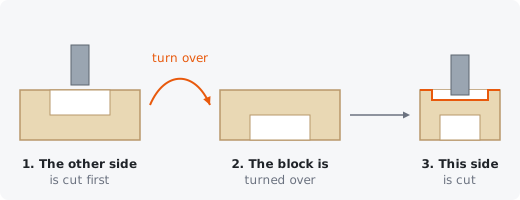
The list shows both sides under headings, in the order they are cut. While you scrub, a line under the slider says which side is up and after which segment the block is turned over. The block turns over the way Job Setup's flip direction says (left to right or top to bottom).
Laser toolpaths #
Laser toolpaths are previewed as shallow burns. The beam does not cut down like a bit, so each burn is shown as a groove of the Preview depth set in the laser toolpath's form, at least one simulation cell wide so even a fine kerf is visible.
A laser module with a focal length is shown standing that far above the surface while it burns. See Lasers for laser toolpaths.
Tip: If a laser picture looks too dark or too light in the preview, try a different Preview depth: it only changes the preview, not the burn.