
Lasers #
Carvio can drive a laser as well as a spindle: a diode or CO2 laser machine, or a laser module fitted to a CNC router. Three toolpaths are made for it: Laser Cut follows vectors to cut or score them, Laser Fill hatches the inside of closed shapes, and Laser Picture engraves an image with the power following its darkness.
You find them on the Toolpaths tab (the Laser Cut, Laser Fill and Laser Picture buttons) and on the Toolpaths menu. They are previewed, saved and sent to the machine like any other toolpath.
How laser toolpaths work #
A laser toolpath keeps the beam at one height, the focus, the whole time. The beam is off during rapid moves and on during feed moves, each burning move carrying its own power.
There are no depth passes: to burn deeper or cut thicker material you go over the same line several times (Passes), slow down or turn up the power. Power is a percentage of the laser's maximum; the post processor turns it into the controller's power command (for Grbl, S0 to S1000).
In the preview a laser toolpath is shown as a burn of the Preview depth, so you can see what will be marked. That depth is for the preview only: the laser never moves down into the material.
Warning: Lasers can start fires and their light damages eyes, even reflected. Never leave a running laser alone, wear safety glasses made for its wavelength, and keep the work area ventilated.
Laser tools #
A laser is a tool of type Laser in the Tool Database. Instead of a diameter, flutes and spindle speed it has a beam width, a line interval, a power, a speed and a focal length.
Carvio comes with a laser to start from ("Laser 0.1mm": 0.1 mm beam and line interval, 100% power, 1000 mm/min). Make your own for each laser and material: like other tools, a laser can keep its own values per material (For material in the Tool Database), and the laser forms use the values for the job's material.
Beam width #
The width of the line the beam burns, also called the kerf. Laser Cut offsets the beam by half this width when cutting outside or inside a shape.
Measure it: cut a 20 mm square, measure the piece, and the kerf is the 20 mm less the piece's size. Diode lasers are typically 0.08 to 0.2 mm, CO2 lasers 0.1 to 0.3 mm.
Focal length and Z zero #
The focal length tells Carvio how far the laser module sits above the focus when Z zero is set on the material surface. Leave it at 0 when you set Z zero with the beam already focused on the work.
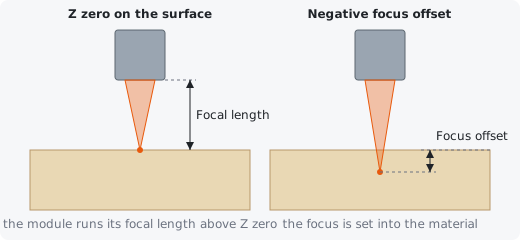
Most dedicated laser machines have no Z axis or are focused by hand: you focus on the material and the focal length stays 0. On a CNC router with a laser module, you usually zero Z on the material surface, as for a cutter; set the module's focal length (from its manual, or by finding the height that gives the thinnest line) and the laser toolpaths run the module that far above the surface. Each laser form says which way it is set up below the options. To move the focus up or down for one toolpath, use the Focus offset.
Laser machines and post processors #
To run a laser from the Machine tab, tick Laser machine (S is the power, no spindle or coolant buttons) in Machine Setup. The spindle panel then becomes a laser panel, with the power as the S value and M3 / M4 to switch the beam on.
To save laser G-code, pick a laser post processor:
| Post | Use it for |
|---|---|
| Grbl Laser (mm / inch) | Grbl 1.1 in laser mode ($32=1): M4 keeps the beam off during rapids and scales the power with the speed. No Z moves. |
| Grbl Laser with Z (mm / inch) | The same, for a laser module on a machine with Z: it moves Z, so the focal length and the focus offset are used. |
| Laser M3 / M5 (mm) | Controllers without a laser mode: the beam is switched on with M3 and off with M5 around every burn. No Z moves. |
The posts without Z leave the height to you: focus the laser before you run the job.
Tip: The machine list can hold a Demo Laser, a controller in software, to try laser jobs on the Machine tab without any hardware.
Laser Settings #
The Laser Settings section under the laser row on every laser form shows the values this toolpath uses: the line interval, the power and the speed. They come from the laser's values for the job's material; change them here to use other values for this toolpath only.
The library tool is not changed. Reset to defaults takes the laser's own values again.
Line interval #
The distance between neighbouring burn lines when filling or engraving a picture, the laser's equivalent of a stepover. Laser Fill and Laser Picture use it unless their own Line interval is set.
0.1 mm (about 254 lines per inch) is a good start for a diode laser: the lines merge into a solid, even fill. Larger intervals are faster but show lines; smaller ones burn darker and take longer.
Power #
The laser's power for this toolpath, as a percentage of its maximum. Laser Cut and Laser Fill burn at this power unless their Power override is set.
Start low on a scrap of the same material and work up: wood and leather often engrave well at 20 to 50% on a diode laser, while cutting needs 80 to 100%.
Speed #
How fast the laser moves while burning, in the app's speed unit. The laser forms use it unless their Speed override is set.
Slower speeds burn darker and deeper. As rough starting points for a 5 to 10 W diode laser: 1000 to 3000 mm/min for engraving, 100 to 400 mm/min for cutting 3 mm plywood.
Options on every laser form #
These options are on two or all three of the laser forms and work the same way on each.
Laser #
The laser tool the toolpath uses: its beam width, focal length and, under Laser Settings, its line interval, power and speed.
Pick a tool of type Laser; the form warns you when the selected tool is something else. Select... opens the Tool Database to choose or make one.
Power override #
The power for this toolpath, in percent. 0 uses the Power in Laser Settings.
Use it to run the same laser at different powers without changing its settings, for example a light score line and a full cut from the same tool.
Speed override #
The burning speed for this toolpath, in the app's speed unit. 0 uses the Speed in Laser Settings.
Rapid moves (with the beam off) are not affected.
Focus offset #
Moves the focus above (positive) or below (negative) the material surface for this toolpath. 0 focuses on the surface.
A slightly negative offset (about a third of the material's thickness) often cuts thicker material faster and straighter, because the beam is narrowest inside the cut. A positive offset defocuses the beam for a wider, softer line. It only has an effect with a post that moves Z (such as Grbl Laser with Z); otherwise set the focus by hand.
Preview depth #
How deep the burn looks in the toolpath preview. It is for the preview only and does not change the G-code.
The preview scales it by each burn's power, so a burn at half power looks half as deep. For Laser Cut, 0 shows the cut going through the material; for Laser Fill and Laser Picture, the default is 0.3 mm (for a picture, this is the depth at full power).
Project onto the machined surface #
The focus follows the stock as the toolpaths above this one leave it, so you can burn onto a carved surface or the floor of a pocket. Between burns the module moves in Z with the beam off.
This needs a post that outputs Z (such as Grbl Laser with Z). Where nothing has been machined yet, the focus stays on the material top. See Project onto the machined surface for how the machined surface is worked out.
Laser Cut #
Laser Cut follows the selected vectors with the beam, offset by half the kerf to the chosen side, at the focus height. Several passes cut thicker material.
Use it to cut parts out, or at a low power to score lines and outlines. Open and closed vectors can both be cut. The cuts are ordered and directed like a profile toolpath, without tabs, ramps or leads.
Cut #
Which side of the vectors the beam runs on. On the line follows the vectors exactly; Outside / Right and Inside / Left offset the beam by half its beam width so the edge of the cut lies on the vector.
Use Outside / Right for parts you cut out, so they come out at the drawn size, and Inside / Left for holes. On the line (the default) is for scoring, engraved lines and parts where the kerf does not matter. For an open vector, right and left are as seen looking along the direction it was drawn.
Climb and Conventional #
The direction the beam travels round the vectors. A laser has no cutting forces, so it makes little difference to the cut.
It only changes which way the beam goes round each shape (and along each open vector). Leave it at Climb unless you have a reason to change it.
Passes #
How many times each vector is cut, all at the same height. Each pass burns a little deeper.
Several faster passes usually give a cleaner edge with less charring than one slow pass. Thin card or veneer may need one pass; 3 mm plywood on a diode laser typically needs 2 to 4.
Laser Fill #
Laser Fill hatches the inside of the selected closed vectors with parallel burn lines, the beam off between the lines. Use it for solid engraved areas: filled lettering, logos, dark backgrounds.
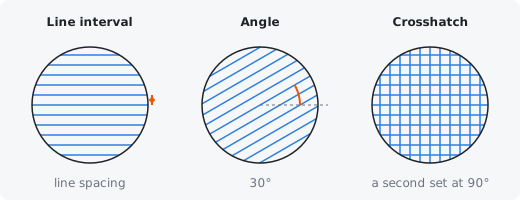
Vectors inside other vectors make holes, so the inside of a letter "O" stays unburnt. Open vectors are skipped. The lines are clipped to the vectors themselves, without allowing for the beam width.
Line interval #
The distance between the burn lines (for a picture, also the size of each sample along a line). 0 uses the Line interval in Laser Settings.
The finer the interval, the more solid and darker the fill and the longer it takes. For a picture, the interval is the resolution: 0.1 mm is about 254 dots per inch.
Angle #
The direction of the burn lines, in degrees. 0° runs them along X.
Lines along the machine's faster or lighter axis often engrave more evenly. An angle such as 45° can hide the line pattern in a fill.
Bidirectional #
Burns alternate lines in opposite directions, back and forth, instead of always in the same direction with a return move between lines.
Bidirectional is about twice as fast and is on by default. If the edges of a fill look ragged (every other line slightly shifted), your machine has some backlash or lag: turn it off for a cleaner edge.
Crosshatch #
Adds a second set of lines at 90° to the first, over the whole area.
It makes fills darker and more even, especially at larger line intervals, and hides the line direction. It doubles the time.
Outline the vectors as well #
Also traces the selected vectors on the line, at the same power and speed, after the fill.
The outline gives filled shapes a crisp edge where the fill lines end.
Laser Picture #
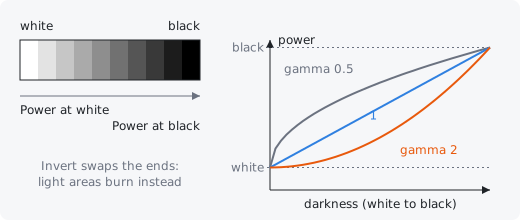
Laser Picture engraves the selected image line by line, the power following its darkness: dark areas burn darker, light areas lighter. Use it for photos and greyscale artwork on wood, leather, slate or card.
Select an image in the 2D view first (import it with File > Import Image); the form shows its name, pixel size and size on the job. The picture is engraved at its size and position in the job, sampled every Line interval along rows the same distance apart. Neighbouring samples with the same power are joined into one burn.
Tip: Photos usually engrave better after you raise their contrast and brightness a little in a photo editor. Test the settings on a small strip of the same material first.
Power at white #
The power for white (the lightest) parts of the picture, in percent. Usually 0, so white areas are not burnt.
Raise it a little if the lightest tones should still be marked: for example 5 to 10% gives a faint tone instead of bare wood. For white itself to be burnt at that power, turn Skip white runs off as well.
Power at black #
The power for black (the darkest) parts of the picture, in percent. Every tone in between gets a power between this and the Power at white.
Set it to the power that gives the darkest burn you want without charring, found on a test piece. Too high and dark areas run together into a black blot.
Gamma #
The curve between the two powers. 1 is a straight line; above 1 the light and middle tones get less power, so the picture looks lighter; below 1 they get more, so it looks darker.
Most materials darken quickly at low power, so a gamma of 1.5 to 2.5 often brings back the detail in the light tones. The range is 0.1 to 5.
Invert #
Burns the light areas instead of the dark ones: white gets the power at black and the other way round.
Use it for a negative, or for materials where the burn comes out lighter than the surface, such as anodised aluminium or black slate.
Skip white runs #
Rapids across parts of a row that are at the Power at white instead of burning them, and skips rows with nothing to burn.
On by default. It only matters when the Power at white is above 0: on, the lightest areas stay bare and the laser crosses them quickly; off, they are burnt at the Power at white too. With a Power at white of 0, white is never burnt either way.