
Job Setup and Files #
Every Carvio project starts with a job: the block of material you will cut, where its origin is and where Z zero is. This chapter explains the Job Setup dialog, material sheets, and the File menu commands for creating, opening and saving projects.
The Job Setup dialog #
The Job Setup dialog sets the size of your material, the units, the XY origin, Z zero, the material type and whether the job is cut from one side or two. Open it with File > New Job... (Ctrl+N) for a new project, or Edit > Job Setup... (F4) to change the current one.
When you start a new job the dialog is called New Job - Job Setup and starts from the default size (300 x 200 x 18 mm, or 12 x 8 x 0.75 inches if you chose inches for new jobs in Edit > Preferences...). Click OK to apply your settings, or Cancel to leave everything as it was.
You can also open it from the Job Setup button in the Drawing tab's File Operations section, the Job Setup... button in the Toolpaths tab's Material Setup, or by right-clicking an empty spot in a view.
Tip: Changing the job setup later is fine. Vectors stay where they are relative to the origin, and toolpaths are marked out of date so you can recalculate them. You can undo a job setup change with
Ctrl+Z.
Name #
The name of the job. It is shown in the window title until the project is saved, and it is printed on the setup sheets.
Units #
Choose mm or inches. Every length in Carvio is shown and typed in these units: sizes, positions, depths, the rulers and the status bar. It is the same setting as Distance in Preferences, so it applies to the whole app, and new jobs start in it.
Carvio keeps everything internally in millimetres, so you can switch the units at any time without changing your design. You can still type a length in the other unit, for example 1in in a mm job (see Typing numbers and formulas).
Job Size #
The size of your piece of material: Width (X), Height (Y) and Thickness (Z). The 2D view draws the material as a rectangle of this width and height.
Width #
Width (X) is the size of the material along the machine's X axis, left to right in the 2D view.
Height #
Height (Y) is the size of the material along the machine's Y axis, bottom to top in the 2D view.
Thickness #
Thickness (Z) is how thick the material is. Toolpaths use it to know where the bottom of the material is, and the 3D view and the preview draw a block this thick.
Measure your actual board: a "19 mm" board is often 18 mm or less. For a cut-out, the profile depth must reach at least the thickness.
Z Zero Position #
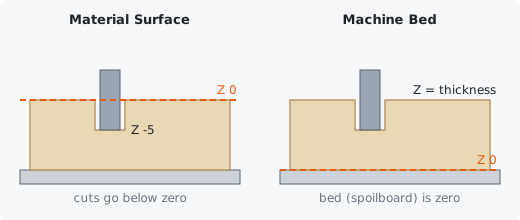
Z zero is the height the machine calls Z 0. Choose whether it is the top of the material or the machine bed (the bottom of the material); it must match where you zero the Z axis on the machine before you cut.
Material Surface #
Z 0 is the top of the material. Cuts go down into negative Z: a 5 mm deep pocket bottoms out at Z -5. Zero your tool on top of the board.
This is the most common choice. Your depths are right however thick the board really is, but a through cut depends on the thickness you entered.
Machine Bed #
Z 0 is the bottom of the material, where it rests on the bed or spoilboard. The top of the material is at Z = thickness, and cuts go down towards zero. Zero your tool on the bed (or spoilboard).
Through cuts always end at the same height, whatever the board's thickness, but the depth from the top depends on the thickness you entered being right.
XY Datum Position #
The XY datum is the point on the material that becomes X 0, Y 0 in the G-code: a corner or the centre. Set the machine's X and Y zero on that same point of the real board before cutting.
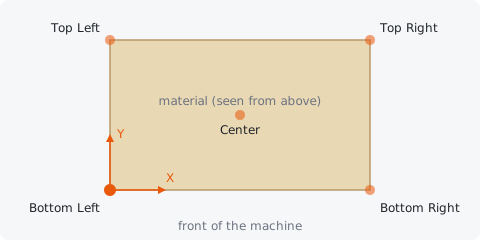
The choices are Bottom Left, Bottom Right, Top Left, Top Right and Center. All positions in Carvio (the rulers, the status bar, the X and Y fields) are measured from the datum, and the 2D view marks it with a red cross.
Bottom Left #
X 0, Y 0 is the bottom-left (front-left) corner of the material. The whole job lies in positive X and Y. This is the usual choice for most routers.
Bottom Right #
X 0, Y 0 is the bottom-right (front-right) corner of the material. The job lies in negative X and positive Y.
Top Left #
X 0, Y 0 is the top-left (back-left) corner of the material. The job lies in positive X and negative Y.
Top Right #
X 0, Y 0 is the top-right (back-right) corner of the material. The job lies in negative X and negative Y.
Center #
X 0, Y 0 is the centre of the material. Useful when you place a board by its middle, or for round and symmetric parts.
Job Type #
Choose Single sided for a job cut from the top only, or Double sided when you will turn the material over and cut its other face too.
Single sided #
The job is cut from the top face only. This is the default.
Double sided #
The job has a top side and a bottom side, each with its own vectors, 3D model and toolpaths. You machine the top, flip the board over, and machine the bottom.
When you choose Double sided, the Flip direction option appears, and two buttons on the toolbar choose which side you are editing. Press F6 (or Vectors > Switch Side) to switch between them. The status bar shows Side: Top or Side: Bottom.
The bottom side is shown as you will see it after flipping the material. The vectors of the other side show through as faint dashed lines, mirrored, so you can line the two sides up.
- Copy Selection to Other Side (in the Vectors menu, or Copy to Other Side when you right-click) puts a mirrored copy of the selected vectors on the other side, exactly where they will land after the flip.
- The Toolpath List, the preview and Save Toolpaths work on the side you are editing. Save the G-code for each side separately.
- The setup sheet notes the side and the flip direction.
Tip: Holes drilled right through, or dowel pins in the spoilboard, make it easy to put the board back in exactly the right place after flipping.
Copy Selection to Other Side #
Puts a mirrored copy of the selected vectors on the other side of a double-sided job, exactly where they will land after the flip. The originals stay on this side. Use it for parts that are cut from both faces, such as a profile cut half way from each side.
Flip direction #
How you turn the material over between the two sides. Horizontal flips it left to right (about a line running front to back, so X is mirrored). Vertical flips it front to back (about a line running left to right, so Y is mirrored).
The flip is about the centre line of the material. Pick the one you will really do at the machine, so the bottom side lines up with the top.
Material #
The kind of material you are cutting, from the Material Database (Toolpaths > Material Database...). Tools use their cutting values (pass depth, stepover, feed and speed) for this material, and the 3D view takes its look from it.
Choose (not set) to use each tool's default values.
Appearance #
How the stock looks in the 3D view and the toolpath preview: pine, oak, walnut, plywood, MDF, acrylic, stone, metals and more. It follows the chosen material until you pick another one here.
The appearance is only for looks; it does not change any toolpath.
Model resolution #
How fine the grid of the 3D model is: Standard (fastest), High or Very High (slowest). Higher resolutions show more detail in 3D reliefs but take longer to calculate and use more memory.
The model grid has about 1000 cells along the longest side of the material at Standard, 1600 at High and 2400 at Very High. Stay at Standard unless you need fine detail in a 3D carving.
Material sheets #
A job can have several material sheets: pieces of the same material and thickness, each with its own vectors and toolpaths. Use them when a project needs more than one board, for example the parts of a cabinet nested onto several sheets of plywood.
The sheets are listed in the Sheets section of the Layers tab. Every job starts with Sheet 1. The 3D model is shared by all sheets.
- Click the round button beside a sheet, or double-click its name, to edit that sheet. The views then show only that sheet's vectors and toolpaths.
- Click a sheet's name to choose it for the buttons below the list.
- The list shows how many vectors and toolpaths each sheet holds.
- While the job has more than one sheet, the toolbar has a list for switching sheets (Sheet being edited), Next Sheet in the right-click menu of an empty spot goes on to the next one, and the status bar says which sheet you are on (for example Sheet 2 of 3).
The Toolpath List, the preview and Save Toolpaths work on the sheet you are editing. Save the G-code for each sheet in turn.
Add sheet #
Adds a new, empty sheet to the job and switches to it.
Delete sheet #
Deletes the chosen sheet. Its vectors and toolpaths move to the first sheet, so nothing is lost. The first sheet cannot be deleted.
Moving vectors between sheets #
To move vectors to another sheet, select them, click the other sheet's name in the list (without switching to it), and click Move selection here. Copy selection here puts a copy on that sheet and leaves the originals where they are.
You can also right-click a selection and choose Move to a sheet. Type a new name in the Rename box to rename the chosen sheet.
Tip: The Nest tool can create new sheets for you: with Parts that do not fit go to new sheets ticked, the parts that do not fit on one sheet go onto the next. See Nest.
The File menu #
The File menu creates, opens and saves projects, and imports and exports files. A Carvio project is a single .carvio file holding the job setup, vectors, images, the 3D model, the toolpaths and the project notes.
| Command | Shortcut | What it does |
|---|---|---|
| New Job... | Ctrl+N |
Starts a new project; the Job Setup dialog opens first. |
| New Window | Opens another Carvio window, with its own job. | |
| Open... | Ctrl+O |
Opens a saved project. |
| Open Example | Opens one of the example projects that come with Carvio (the ones the free trial opens). | |
| Save | Ctrl+S |
Saves the project (asks for a name the first time). |
| Save As... | Ctrl+Shift+S |
Saves the project under a new name. |
| Import... | Ctrl+I |
Imports vectors, an image, a 3D model, a clip or another project. See Importing. |
| Import Vectors..., Import Image..., Import 3D Model... | Import one kind of file only. | |
| Export Vectors... | Saves the vectors as SVG or DXF. | |
| Export Component... | Saves the selected 3D component as an STL or OBJ mesh. | |
| Export Selection as Clipart..., Add File to Clipart Library... | Adds to your clipart library. | |
| Save Image... | Saves a PNG picture of the 3D view. | |
| Save Toolpaths... | Writes the toolpaths as G-code. | |
| Project Notes... | Notes kept with the project. | |
| Setup and Tool Sheets... | Setup and tool sheets to print or save as PDF. | |
| Recent files | The last projects you saved or opened. | |
| Exit | Alt+F4 |
Closes Carvio. |
The Drawing tab's File Operations section has New, Open, Save, Import, Export and Job Setup buttons that do the same.
New Job #
File > New Job... (Ctrl+N) opens the Job Setup dialog for a fresh project. When you click OK the current project is closed and an empty one starts with the size you set.
Warning: New Job does not ask you to save first. Save the current project before you start a new one if you want to keep its changes.
Opening projects #
File > Open... (Ctrl+O) opens a .carvio project. If the current project has unsaved changes, Carvio asks before it throws them away.
A project opens in the background: the status bar shows Loading while Carvio reads it and recalculates its toolpaths, and the window stays usable meanwhile.
The last six projects you opened or saved are listed near the bottom of the File menu. Click one to open it again.
To add another project's drawing to the one you have open instead, use File > Import...: see Merging projects.
The file window #
On Windows and macOS, Carvio uses the system's own windows for opening and saving files. Elsewhere it shows its own file window: the Folder box at the top (type a path and press Enter to go there), Up to go to the folder above, the list of folders and of the files that fit the command, and the File name box.
Double-click a folder to open it and a file to choose it, or type a name and click Open (or Save). When saving, the file type's extension is added if you leave it off. Carvio remembers the last folder you used.
Saving projects #
File > Save (Ctrl+S) writes the project to its file; the first time it asks where to save it. File > Save As... (Ctrl+Shift+S) always asks for a new name, and the project carries on under that name.
The window title shows the project's file name, with a * after it while there are unsaved changes.
Every saved project carries a small picture of the job from above: the material in its colour, the 3D model shaded and the vectors drawn as in the 2D view. Your file manager shows it as the file's thumbnail, and Carvio's own file window shows it beside the list when you pick the file. See Show file previews in the file manager.
Save As #
File > Save As... (Ctrl+Shift+S) saves the project under a new name or in another folder. From then on the project carries on under the new name, and the old file stays as it was.
Use it to keep a copy of a project before trying something new, or to start a new project from an old one.
New Window #
File > New Window starts a second Carvio in a window of its own, with its own job. Use it to look at two projects side by side, or to copy vectors from one project to the other.
Each window is a separate program: closing one does not close the others, and each asks about its own unsaved changes.
Autosave and recovery #
Carvio saves a recovery copy of your unsaved work every few minutes. If Carvio or the computer stops unexpectedly, it offers to bring that work back the next time it starts.
The recovery copy is written only while there are unsaved changes, and only when you pause for a moment, so it never interrupts a drag. It is kept apart from your own project file and is removed when you save or close Carvio normally.
When Carvio starts after it did not close normally, it asks Recover unsaved work. Choose Yes to open the recovered project: it keeps the name of the file you were working on and is marked as unsaved, so save it to keep it. Choose No to start without it.
Set how often the recovery copy is written with Autosave every in Edit > Preferences... (2 minutes by default; 0 turns it off).
Exiting #
File > Exit (Alt+F4), or the window's close button, closes Carvio. If the project has unsaved changes Carvio asks whether to Save, Don't save or Cancel.
If a job is running on the machine, Carvio warns you first: closing stops the job. Choose Keep running to carry on cutting.