
Getting Started #
Carvio is a design and CAM program for CNC routers and lasers. You draw or import a design, turn it into toolpaths, check them in a 3D preview, and then save G-code or send the job straight to your machine.
This chapter gives you the big picture and walks you through a first small project. The chapters after it describe each part of Carvio in detail.
What Carvio does #
Carvio takes you from an idea to a finished part on one screen: 2D drawing, 3D relief modeling, toolpaths, simulation and machine control. Everything you make is kept in one project file (.carvio).
With Carvio you can:
- Draw vectors (lines, shapes, curves and text) or import them from SVG and DXF files.
- Build 3D reliefs from your vectors, from images or from STL / OBJ models.
- Create 2D toolpaths (profile, pocket, drill, V-carve, engraving, inlay and more), 3D roughing and finishing toolpaths, and laser cut, fill and picture jobs.
- Preview the toolpaths cutting a virtual block of material.
- Save the G-code for your controller, or connect to a GRBL-style machine and run the job from Carvio.
- Print setup and tool sheets so the person at the machine knows how to set it up.
The workflow #
Most projects follow the same steps, from left to right across the window: set up the job, design, model (if you need 3D), make toolpaths, preview them, then save or run.
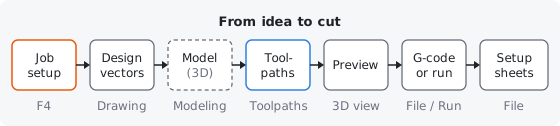
| Step | What you do | Where |
|---|---|---|
| 1. Job setup | Set the material size, thickness, units, the XY origin and where Z zero is. | File > New Job... (Ctrl+N) or Edit > Job Setup... (F4) |
| 2. Design vectors | Draw shapes and text, or import drawings and images. | Drawing tab, Vectors menu, File > Import... |
| 3. Model (optional) | Turn vectors or images into 3D components. | Modeling tab, Model menu |
| 4. Toolpaths | Select vectors, pick an operation and a tool, set the depths. | Toolpaths tab, Toolpaths menu |
| 5. Preview | Watch the toolpaths cut a virtual block and check the result. | Toolpaths > Preview Toolpaths... |
| 6. Output | Save G-code for your controller, or run the job on a connected machine. | File > Save Toolpaths..., Machine menu, Run tab |
| 7. Sheets | Print or save the setup and tool sheets for the shop. | File > Setup and Tool Sheets... |
Each step has its own chapter: Job Setup and Files, Drawing Vectors, Editing Vectors, 3D Modeling, Previewing Toolpaths, Saving G-code, Machine Control and Setup Sheets and Project Notes.
You can go back to any step at any time. When you change a vector or the model after making toolpaths, Carvio marks those toolpaths as out of date so you can recalculate them.
Your first project #
This walk-through makes a simple sign: a rectangle with rounded corners cut out of a board, with a word carved into it. It takes about five minutes.
1. Set up the job #
Choose File > New Job... (or press Ctrl+N). The Job Setup dialog opens.
- Type a name, for example My first sign.
- Pick your units, mm or inches.
- Enter the size of your board: Width (X), Height (Y) and Thickness (Z).
- Leave Z Zero Position on Material Surface and XY Datum Position on Bottom Left for now.
- Choose a Material if you have one set up; tools then use their cutting values for it.
- Click OK.
The 2D view now shows your board as a white rectangle. The small red cross is the job's origin (X 0, Y 0).
2. Draw the outline #
- On the Drawing tab, click Rectangle in the Create Vectors section.
- In the form that opens, enter a Width, a Height and a Corner radius a little smaller than your board.
- Click the middle square of the anchor grid, set X and Y to the centre of the board, and click Create.
You can also just drag in the 2D view to draw the rectangle. See Rectangle.
3. Add some text #
- Click Text in the Create Vectors section.
- Type a word in the Text box, pick a Font and set the Height.
- Click inside the rectangle in the 2D view to place the text there.
Press Esc to put the tool away. See Text.
4. Make the toolpaths #
- Click the text to select it.
- On the Toolpaths tab, click V-Carve, choose a V-bit as the tool and click Calculate.
- Click the rectangle to select it, click Profile, choose an end mill, set the cut depth to the full thickness of the board and click Calculate.
The toolpaths appear in the Toolpath List. Each operation is described in its own chapter.
5. Preview #
Choose Toolpaths > Preview Toolpaths... (or click Preview toolpaths on the toolbar). Carvio switches to the 3D view and cuts the toolpaths into a virtual block so you can see the finished sign. See Previewing Toolpaths.
6. Save the G-code, or run the job #
- To use another program to run your machine, choose File > Save Toolpaths..., pick the Post (post processor) for your controller and save the file.
- To run the job from Carvio, connect your machine from the Machine menu, then use Machine > Build Job from Toolpaths and the Run tab.
7. Save the project #
Choose File > Save (Ctrl+S) to keep the project as a .carvio file. It holds your vectors, model, toolpaths and job setup, so you can open it again later and carry on.
Tip: Before you cut, print the setup sheet with File > Setup and Tool Sheets.... It lists the tools in order and shows where the origin and Z zero are.
Getting help #
Help is never far away in Carvio: rest the pointer on an option for a short explanation, press F1 for the full topic, or open this manual from the Help menu.
Mouse-over help #
Rest the mouse pointer on a button, a field or a checkbox for a moment and a short explanation pops up, often with a small diagram. It is the first paragraph of the matching topic in this manual.
Buttons on the toolbar and the tool palettes also show a short tip with their keyboard shortcut, if they have one.
You can turn mouse-over help off with Show help when the pointer rests on an option in Edit > Preferences....
Help on a form #
The small question-mark button beside a form's title opens the Help window at that form's topic. Inside the form, rest the pointer on any option and press F1 to read about that option instead.
The Help window #
Press F1 (or choose Help > Carvio Help) to open the Help window. When the pointer is resting on an option, F1 opens the whole topic for that option. Otherwise the Help window opens where you left it.
The Help window has a list of contents, a search box that looks through every topic, and links between topics. Click a link to jump to that topic.
The arrow buttons at the top left go back and forward through the topics you have read, Contents clears the search and shows the start of the manual, and Ctrl+F jumps to the search box. The window can stay open beside your work.
Where Help is shown #
Help opens in a window of its own that you can put beside Carvio or on a second monitor, or it can sit in a tab of the side panel. Click the button at the right end of Help's bar to choose. Carvio remembers your choice, and F1 opens Help there next time.
- Show in the Side Panel: a Help tab in the right-hand panel. Drag the tab to move it, like any other tab, for example under the Toolpaths tab or to the left side. The panel is narrow, so the contents button (the list icon) swaps between the contents and the page. Press
F1with the pointer away from any option to close the tab. - Show in Its Own Window (the first choice): a separate window with its own title bar, which you can move, resize and minimize on its own.
F1on an option brings it to the front at that option's topic. Its close button closes Help.
Carvio reads the help in the background as it starts. Until it is read, Help shows Loading the help... and the mouse-over cards do not come up yet.
Close Help closes Help wherever it is. Right-click the Help tab in the side panel for the same choices.
Printing the manual #
Choose Help > Print Manual... to get the whole manual as a printable document. It is handy to keep a paper copy next to the machine, or to read it away from the computer.
The window shows the manual's pages exactly as they print. The Help window's Print Manual... button opens it too. It opens as a window of its own (see Open big windows as windows of their own in Preferences).
Carvio lays the pages out in the background, so you can go on working: while it does, the window shows which chapter it is on. Changing the paper lays them out again the same way.
Paper and zoom #
Paper sets the page size of the manual, A4 or Letter; the pages are laid out again when you change it. It is the same setting as the paper of the setup sheets. Zoom sets how large the pages show in the window (Fit width or 50% to 100%); it does not change the PDF.
Print #
Print... prints the manual on one of your printers. On Windows and macOS the system's own Print dialog opens, where you pick the printer, the copies and the pages; on Linux Carvio's Print dialog does. The manual has many pages: choose only the chapters you need with the page numbers from its contents.
Save PDF #
Save PDF... saves the whole manual as a PDF file, ready to print or read on any device. The contents and the links between topics work in the PDF, and its side bar lists the chapters. The file is written in the background; the status bar shows how far it got and says when it is saved.
Licence #
Help > Licence... opens the Licence dialog: sign in to carviocnc.com, paste a licence key or load a licence file, or see what the free trial can do.
About Carvio #
Help > About Carvio shows which version of Carvio you are running, with a short description of what it does. Give the version number when you report a problem.