
Machine Control #
Carvio can drive your CNC machine directly: connect to a grbl or grblHAL controller, jog, home, set the work zero with a touch plate, then run the job while the Machine view shows the material being cut, live.
The controls live in three panels, all on the Machine menu:
| Panel | What it holds |
|---|---|
| Machine Panel | Connection, status and position (DRO), jogging, spindle, overrides, probe, macros |
| Run Panel | Building or loading the job, Start / Pause / Stop, tool changes, saved jobs |
| Console | The conversation with the controller, and a line to type your own commands |
Tip: No machine yet? Carvio comes with two demo machines, Demo CNC and Demo Laser: controllers in software that you can connect to, jog, probe and run jobs on, with no hardware at all. They are a safe way to learn this chapter.
Warning: A CNC machine can hurt you. Keep your hands clear while it moves, know where your emergency stop is, and check the job in the preview first. The buttons in Carvio are not a substitute for an emergency stop.
Connecting #
The Connection section picks the machine profile, its port and baud rate, and connects. Choose the machine from the list, choose the serial port, then click Connect.
Once connected, the section shows the controller's name and version (for example "Grbl 1.1h"), the port and the size of the controller's receive buffer. While Carvio waits for the controller to answer, Cancel stops trying. Disconnect is not available while a job runs.
- Port: the serial ports found on this computer; the button beside it rescans them (after you plug the machine in, say). If the profile's port is missing, the section tells you.
- Baud: the serial speed; grbl uses 115200.
- Setup... opens Machine Setup to edit the profile.
A network machine shows its address instead of a port, and a demo machine says it is the built-in demo controller. Machine > Connect and Machine > Disconnect do the same as the buttons.
Note: Many grbl boards restart when the port opens; Carvio then waits for their greeting. If yours does not answer, check the baud rate and the Reset the controller when connecting option in Machine Setup.
Connect #
Opens the connection to the controller of the chosen machine profile. Disconnect closes it again (not while a job is running).
Port #
The serial port the controller is on: COM3 on Windows, /dev/ttyUSB0 or /dev/ttyACM0 on
Linux, /dev/cu.usbserial... on a Mac. Use the rescan button after plugging the machine in.
Baud #
The speed of the serial connection. It must match the controller: grbl and most grblHAL boards use 115200.
Machine Setup #
Machine > Machine Setup... (or Setup... on the Connection section) keeps a profile for each of your machines: how to reach it, its size, jogging, spindle, probe and the commands it needs. The list on the left holds the profiles: New adds one, Copy duplicates the selected one and Delete removes it.
Click OK to keep your changes. Profiles are saved in a machines.json file in Carvio's
settings folder; the bottom of the dialog shows where.
Connection settings #
How Carvio reaches the controller of this machine, and how it talks to it.
| Option | What it does |
|---|---|
| Connection | Serial port, Network (TCP) or Demo (built-in simulator) |
| Port / Port (typed) | Pick the serial port, or type its name if it is not listed |
| Baud rate | The serial speed (115200 for grbl) |
| Host / TCP port | The address of a network controller (grblHAL over Ethernet or WiFi) |
| Controller | Detect from the controller's greeting, or force Grbl 1.1 or grblHAL |
| Receive buffer | The controller's input buffer in bytes; 0 uses the usual size (128 for grbl, 1024 for grblHAL) |
| Status poll | How often Carvio asks for the position, in milliseconds |
| Reset the controller when connecting | Pulses DTR so an Arduino-based board restarts and greets Carvio |
Connection #
How Carvio reaches this machine: through a Serial port (USB), over the Network (TCP), or the Demo (built-in simulator), a controller in software with no hardware.
Controller #
The firmware of the controller. Detect (from the greeting) works for nearly everyone; choose Grbl 1.1 or grblHAL only if detection gets it wrong.
It matters for tool changes: classic grbl does not accept M6, so Carvio leaves that word
out and holds the job itself at a tool change; grblHAL gets the M6.
Receive buffer #
The size of the controller's input buffer, which Carvio keeps full to stream smoothly. Leave it at 0 unless you know your board has a different buffer from the standard one.
Status poll #
How often, in milliseconds, Carvio asks the controller where it is. 200 ms is a good balance; shorter makes the position display and the Machine view smoother.
Reset the controller when connecting #
Pulses the DTR line when the port opens, which restarts an Arduino-based grbl board so it greets Carvio. Untick it for boards that should keep running when you reconnect.
Machine settings #
The size of the machine, whether it is a laser, what the Machine view draws and the safe height for Carvio's own moves.
| Option | What it does |
|---|---|
| Travel X / Y / Z | How far each axis can move; used to check that a job fits and to draw the travel box |
| Read from the controller | Fills in the travel from grbl's $130, $131, $132 |
| Laser machine | S is the laser power; no spindle or coolant buttons |
| Draw the travel box in the Machine view | Shows the machine's working space as a box |
| Draw the machine bed | Shows a thin board under the stock, across the travel |
| Safe Z for moves | The work Z that Go to zero and Frame job rise to before moving |
Travel #
How far each axis can travel, in the app's distance unit. Carvio uses it to check that a job stays inside the machine at the current work zero and to draw the travel box. Read from the controller ($130-$132) copies the values from grbl's settings while you are connected.
Laser machine #
Tick it for a laser: the Spindle section becomes Laser, S is the power, and the coolant buttons go away.
Safe Z for moves #
The work Z height that Carvio's own moves rise to before travelling: Go to zero, Frame job, and resuming after a tool change or pause. Set it clear of clamps.
Draw the travel box #
Draws the machine's working space as a wire box in the Machine view, and the bed as a thin board under the stock. Both need the travel to be set.
Jogging settings #
Step sizes is the list of jog steps the Jog section offers, in the app's
distance unit, separated by commas (for example 0.1, 1, 10, 100 in mm).
A machine left on the standard 0.1, 1, 10, 100 mm steps jogs 0.001, 0.01, 0.1, 1 inch
while the app works in inches. Feed XY and Feed Z are the jog speeds, and
Keyboard jogging in the Machine view lets the arrow keys jog.
Spindle settings #
Default speed is the speed the spindle buttons start with; Maximum speed is the spindle's top speed.
Probing settings #
The touch plate you use: Plate thickness, Probe feed, Max distance, Retract, and for an XYZ corner plate XYZ plate lip X / Y, Lip drop and Plate size (square). The Probe section of the Machine panel uses and edits the same values.
Streaming #
Strip comments from streamed lines removes (comments) before sending, which leaves more
room in the controller's small buffer. Hold before every tool change so the tool can be
swapped pauses the job at each tool change (see Tool changes).
Hold before every tool change #
When ticked, a job pauses at every tool change so you can swap the tool, even when the G-code does not pause there itself. Leave it on unless your machine has an automatic tool changer.
Startup commands #
G-code lines sent to the controller every time you connect: a work coordinate system, units, anything your machine should start with. Add line adds a line; the cross removes one.
Macros #
Named groups of G-code lines you can run with one click from the Macros section of the Machine panel: go to a park position, turn on a vacuum, run a warm-up. Each new profile has a "Go to park" macro to start from.
Demo machines #
Demo CNC (a router with 800 x 760 x 100 mm of travel) and Demo Laser (400 x 400 mm) are grbl controllers inside Carvio. They answer like a real board, move at the programmed feeds, report their position, hold, resume, reset, set work offsets and touch a virtual probe plate.
Use them to try a job end to end, practise probing, or check how a tool change will go. If you deleted them, Edit > Preferences... > Add the demo machines puts them back.
Status and position #
The Status section shows the machine's state as a coloured badge, the position of every axis, and buttons to zero, go to zero and home. The large numbers are the work position (relative to your work zero); the grey ones beside them are the machine position (relative to the machine's home).
| State | Meaning |
|---|---|
| Idle | Ready; you can jog |
| Run | Moving under a program |
| Jog | Jogging |
| Hold | Paused by a feed hold; Resume carries on |
| Alarm | Stopped for safety: unlock or home |
| Home | Homing |
| Check | Check mode: the program runs without moving |
| Door | The safety door is open |
Under the axes you see the feed and spindle speed, the overrides and the controller's modal state (work coordinate system, units, plane...).
Tip: Click an axis' work position, type a position and press
Enterto move there.Escapecancels.
Alarm #
An alarm stops the machine for safety: after a reset, a limit switch, a failed probe or at power-up on a machine that must be homed. The section shows the alarm and what it means, with Unlock $X, Home $H and Reset buttons.
Home if you can: it clears the alarm and gives the machine a known position. Unlock clears the alarm without homing; then the machine does not know where it is, so jog carefully.
Soft reset #
Sends the controller a soft reset (Ctrl-X): it stops at once and forgets the commands it
was given. A running job is abandoned, and nothing more of it is sent.
The controller keeps its settings and work offsets. If the machine was moving when you reset, grbl may go into alarm because it can no longer be sure of its position: home or unlock it. The Reset button under an alarm, the Reset button on the Console and Machine > Soft Reset (Ctrl-X) all do this.
Move to a position #
Click an axis' work position, type where it should go and press Enter: the tool jogs there
along that axis alone, at the jog feed. Escape or a click elsewhere leaves it.
The position is in work coordinates and the job's units, and you can type a sum such as
10+2.5. It works only when the machine could jog (idle, connected).
Zero #
Makes the tool's current position the work zero: the X0, Y0 and Z0 buttons beside each axis zero that axis alone, Zero XY zeroes X and Y, and Zero all all three. The zero is stored in the controller, in the active work coordinate system.
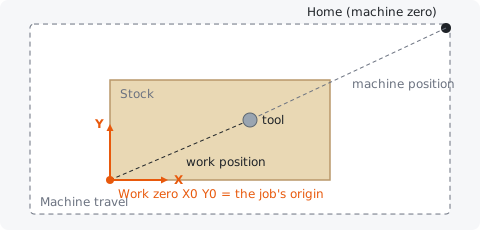
Jog the tool to the job's origin on the stock (the corner or centre set as the XY datum in Job Setup) and zero X and Y there; set Z on the top of the stock (or with the probe).
Go to zero #
Rises to the profile's Safe Z for moves, then travels to the work zero X0 Y0. The button in the middle of the jog pad does the same.
Coordinates #
The work coordinate system in use, G54 to G59. Each keeps its own zero, so you can keep a fixture's zero in G55 while you use G54 for one-off jobs. Most people never leave G54.
Home #
Runs the controller's homing cycle ($H): the machine finds its limit switches and knows
exactly where it is. Grbl keeps work zeros relative to home, so on a homed machine a zero you
set earlier is still where you left it. Needs homing switches; Machine > Home ($H) does the same.
Jogging #
The Jog section moves the tool by hand: pick a Step, then click the arrow buttons for X, Y and Z. Tick Continuous to move for as long as you hold a button instead of one step at a time.
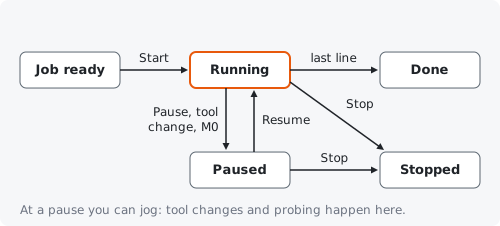
Jogging needs an idle machine; during a job it works only while the job waits at a pause (a tool change, a probe). Continuous jogs stop when you release the button.
Step #
How far one click of a jog button moves the tool, in the app's distance unit. The steps on offer come from Step sizes in Machine Setup.
Continuous #
When ticked, a jog button moves the tool for as long as you hold it down, and stops when you let go.
Feed XY and Feed Z #
The speeds of jogging moves, in the app's speed unit: Feed XY for X and Y, Feed Z for Z alone. Keep Feed Z low enough to stop in time above the stock.
Keyboard jogging in the Machine view #
When ticked, the arrow keys jog X and Y and Page Up / Page Down jog Z by the step, while
the Machine view is showing. Leave it off if you might bump the keyboard.
Gamepad #
A gamepad (an Xbox, PlayStation or other game controller, plugged in by USB or paired over Bluetooth) can jog the machine and work its main controls, so you can stand at the machine instead of reaching for the mouse. Carvio finds a pad within a couple of seconds of it being plugged in or switched on; the Jog section of the Machine tab names it, and Machine > Gamepad Setup... (or Gamepad Setup... in the Jog section) sets it up.
Out of the box:
| On the pad | Does |
|---|---|
| Left stick | jogs X and Y, faster the further it is pushed |
| Right stick up / down | jogs Z |
| D-pad | steps X and Y by the jog step |
| LB / RB (L1 / R1) | steps Z down / up |
| X / Y (Square / Triangle) | smaller / bigger jog step |
| LT (L2) held | slow jog: the sticks at a quarter speed |
| B (Circle) | feed hold: stops a jog, a job (it can resume), homing or a macro |
| A (Cross) | resumes a held job (it never starts one) |
| Back (Share), held | zero X and Y |
| Start (Options), held | zero Z |
A stick only jogs once it has been seen at rest, so a stick held or drifting when the pad comes does not start the machine. Let go and the machine stops; pull a stick the other way and it stops before going back. Like the jog buttons, the pad jogs only an idle machine, or one waiting at a pause (a tool change). Nothing moves while Gamepad Setup is calibrating or learning.
On Linux the pad is read from /dev/input. Desktops let the person logged in read game
controllers; where Gamepad Setup says it may not read the pad, add yourself to the input
group (and log in again) or add a udev rule for it.
Use a gamepad for jogging and the machine controls #
Untick it to have Carvio leave gamepads alone.
Only while Carvio is the active window #
When ticked (the default), the pad does nothing while another program is in front, so a game or another program using the pad cannot move the machine.
Jog X, Jog Y and Jog Z #
The stick (or trigger) that jogs each axis, how far it is pushed now, and Invert to turn its direction round. Learn... takes the next stick you push: push it right for X and up for Y and Z, and the direction is learnt too.
Invert #
Turns the axis' direction round: pushing the stick right (or up) jogs the axis the minus way.
Learn #
Waits up to ten seconds for you to push a stick or press a button on the pad, and takes it for that row. Click it again (Cancel) to stop waiting.
Top speed #
The speed of a stick pushed all the way, as a share of the machine's jog feed (Feed XY and Feed Z in the Jog section).
Slow jog speed #
The speed while the Slow jog while held button is held, as a share of the top speed: for creeping up to an edge or the stock's top.
Dead zone #
How far a stick may move off its centre before it jogs. Raise it if the machine creeps with the stick let go (or calibrate the pad).
Response curve #
1 makes the speed grow evenly with the stick; higher values keep it slow for most of the stick's travel and fast only near the end, for finer control.
Buttons #
The button for each control. Step buttons jog one jog step, as the Jog section's arrows do; Smaller step and Bigger step change the step.
Enable button #
With a button chosen here, nothing moves unless it is held (Feed hold always works): a dead man's switch for jogging.
Feed hold and resume #
Feed hold / stop stops whatever moves: a stick or step jog, a job (held, so it can resume), homing or a macro. A stick then waits to be let go before it jogs again. Cycle start / resume resumes a held job; it never starts one.
Zero and home #
Zero XY, Zero Z, Zero all, Go to work zero and Home do as the Machine tab's buttons, once their button has been held for a moment (so a knock does not lose the work zero). Gamepad Setup shows the hold filling up.
Calibrate #
Worn or cheap sticks may not rest at their centre or reach their ends, so they creep or never reach full speed. Calibrate... watches every stick and trigger while you move them round their ends, then reads where they rest when you let go. The bars show each axis as the pad reports it, with the calibrated ends and rest marked. Reset calibration forgets it.
Defaults #
Puts the sticks, buttons and speeds back as Carvio first had them (the calibration stays).
Spindle, coolant and overrides #
The Spindle & Coolant section starts and stops the spindle by hand: set the Speed, then On CW (M3), On CCW (M4) or Off (M5); and the coolant with Flood (M8), Mist (M7) and Coolant off (M9). On a laser machine the section is called Laser, with Power (S) and On / Off buttons.
These buttons are disabled while a job runs.
Overrides #
The Overrides change the feed, rapid and spindle speed of the machine as it runs, a job included, without touching the G-code. Use them to slow down a cut that chatters or speed up one that is too timid.
| Override | Buttons |
|---|---|
| Feed | -10, -1, 100%, +1, +10 (percent) |
| Spindle | -10, -1, 100%, +1, +10 (percent) |
| Rapid | 25%, 50%, 100% |
| Machine | Hold ! (feed hold), Resume ~ (cycle start), Spindle stop / Spindle restart |
The current values show beside each heading. Spindle stop and restart work while the machine is in a hold. While a job runs, the Machine view also has feed and spindle override buttons along its bottom edge.
Feed hold and cycle start #
Machine > Feed Hold (!) sends grbl's feed hold: the machine slows to a stop on its path and waits, with the spindle still on. Machine > Cycle Start / Resume (~) carries on from the hold.
They are the same as Hold ! and Resume ~ in the Overrides section, and work at any time while connected. To pause a job you are running from Carvio, use Pause and Resume in the Run panel instead: they also stop and restart the sending of the job's lines.
Probing #
The Probe section sets the work zero with a touch plate: Z alone with a flat plate on the stock, or X, Y and Z at once with a corner plate (the OpenBuilds XYZ kind) hooked over a corner of the stock. Tick the axes, set the plate, position the tool and click the Probe button.
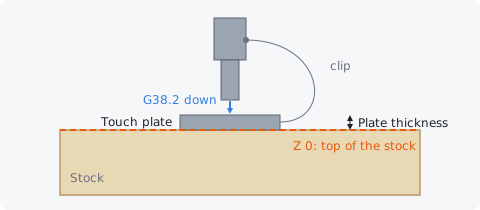
- Z only: lay the plate on the stock under the tool and connect its clip. The tool moves
down (
G38.2) until it touches, the work Z is set to the top of the stock (allowing for the plate's thickness), and the tool lifts off. - X and Y (with or without Z): hook the plate over the chosen Plate corner, connect the clip and put the tool above the plate's outer corner a few mm up (or, without Z, 20 mm outside the corner, level with its sides). Z is probed onto the plate, then X and Y against its lips, allowing for the tool diameter; the work zero becomes the job's origin.
The section's text tells you where to put the tool for the axes you ticked. Stop probe (also in the Machine view) stops a probe under way. The last result shows under the button.
Tip: Touch the plate to the tool with the clip connected before you probe: most controllers show the probe pin in the Status section ("Pins: P"), which proves the circuit works.
Axes #
The axes to probe. Z alone needs only a flat plate; X and Y need a corner plate with lips. The same choice is used by the probe the Save Toolpaths form writes into a program.
Plate corner #
The corner of the stock the XYZ plate hooks over: front left, front right, back left or back right.
Tool diameter #
The diameter of the tool in the spindle, so the X and Y probes can allow for its radius. It starts as the selected toolpath's tool; type the real diameter if you have another tool in.
Plate lip X and Y #
How far the corner plate's lips stand out past the stock's X and Y faces, in the app's distance unit.
Lip drop #
How far the plate's lips hang down the stock's faces, in the app's distance unit. Carvio uses it to draw the plate in the Machine view.
Plate size #
The outer size of the plate (a square, lips included), in the app's distance unit, used to draw it in the Machine view.
Plate thickness #
The thickness of the plate where the tool touches it, in the app's distance unit. After probing Z, the work Z is set so that Z zero is the top of the stock (or its bottom, when the job's Z zero is the bottom).
Measure it with calipers: an error here becomes the same error in every depth.
Probe feed #
How fast the tool moves towards the plate, in the app's speed unit. Slow probes are more accurate.
Max distance #
How far the probe may move looking for the plate. If it does not touch within this distance the probe fails and the controller raises an alarm; unlock and try again closer.
Retract #
How far the tool lifts off the plate after a Z probe, in the app's distance unit.
The Machine view #
The Machine view (F7, or Machine > Machine View, while connected) shows your machine in
3D: the stock where you zeroed it, the tool where the controller says it is, and the job's
toolpaths. While a job runs, the stock is cut as the tool moves, so you see the part take
shape.
In the corner, a box shows the state, the work and machine positions, the feed and spindle speed, the overrides and the job's progress. You orbit, pan and zoom it like the 3D view.
- The travel box and the bed show when the profile has its travel set (and the options are on in Machine Setup).
- The stock appears once its place is known: after you zero X and Y, probe, or start a job. Until then a box asks Where is the stock?, with a Job origin at the tool (XY) button: jog the tool to the job's origin on the stock and click it.
- While a probe runs, the plate is drawn on the stock.
- While a job runs, buttons along the bottom pause, resume and stop it and change the feed and spindle overrides; at a tool change they walk you through it.
- View > Toolpaths in Machine view (or Toolpath lines in the Machine view on the Run panel) shows or hides the toolpath lines.
Job origin at the tool #
Zeroes X and Y with the tool where it stands, so the job's origin (the corner or centre set in Job Setup) is there, and shows the stock in the Machine view. Set Z afterwards with the probe or Z0 on the top of the stock.
Running a job #
The Run panel turns your toolpaths (or a G-code file) into a job and runs it. In the Job section choose where the job comes from, build or open it, then press Start in the Run section.
A typical run:
- Connect, home, and clamp the stock.
- Zero X and Y on the job's origin and set Z (probe or Z0).
- In the Job section, choose Toolpaths and click Build job from toolpaths.
- Click Frame job to trace the job's outline at the safe height and check it fits the stock.
- Click Start. Stay with the machine.
Toolpaths or G-code file #
Choose Toolpaths to run the toolpaths of this project, or G-code file to run a file made elsewhere (or saved earlier).
Build job from toolpaths #
Runs the toolpaths through the chosen Post and makes them the job, with a hold at every tool change. Choose Visible, Selected or All toolpaths first; the list below lets you tick and select them. Machine > Build Job from Toolpaths does the same.
The tool change and probe settings come from the Save Toolpaths form; if that form writes one file per tool, the job pauses for each change instead. Building runs in the background; a bar shows its progress.
On a double-sided job, pick Top side or Bottom side: a job runs one side. Run one side, turn the stock over the way Job Setup says, zero it again on the same corner, then build and run the other side.
Visible, Selected, All #
Which toolpaths go into the job: the ticked (visible) ones, the selected one, or all of them.
Open G-code file #
Open... loads a G-code file (.gcode, .nc, .ngc, .tap, .txt, .cnc) as the job.
Carvio reads it to show the moves in the Machine view and cut the stock as it runs.
Machine > Open G-code File... does the same.
Default tool #
For a G-code file: the tool used to draw and simulate moves whose T number is not in your
tool library.
Job summary #
Once a job is ready, the Job section shows its name, the number of lines, tool changes and estimated time, and its X, Y and Z range. While connected it also checks the job against the machine travel at the current work zero, and warns you if it would run off the machine.
Start, Pause, Stop #
Start sends the job. Pause holds the machine (a feed hold: it slows to a stop on the path); Resume carries on. Stop ends the job: the machine slows to a stop (a feed hold), then the controller is reset and the rest is not sent.
The progress bar shows the lines done, the elapsed time and an estimate of the time left, with the line being run. A job will not start while the machine is in alarm: unlock or home it first.
Note: A pause in the program (
M0) does not hold the controller; Carvio pauses the job instead, so you can still jog. The reason (the comment before theM0) shows in the Run panel and over the Machine view.
Tool changes #
At a tool change the job pauses and the Run panel walks you through three steps, with jog buttons right there:
- Jog the tool clear, put in the tool it names, and click Tool changed.
- Lay the plate under the new tool, lip up, and click Probe Z to measure its length.
- Take the plate off and click Tool change complete: resume.
Resuming lifts the tool to the safe height first; the job's next move then takes it to where it starts. The same buttons appear along the bottom of the Machine view.
Save job at this point #
While a job is paused, Save job at this point and stop... writes it to a .carviojob file:
the program, where it stands, and the stock as cut so far. Then it stops the machine. Use it
when a long job has to wait until tomorrow.
Load saved job #
Load saved job... opens a .carviojob file (or a .carvjob file saved by an earlier Carvio). The stock, as it was cut, appears in the
Machine view and the rest of the program becomes the job. Set up, zero or probe, load the tool
it names and press Start: the machine rises to the safe height, rapids over the saved point,
starts the spindle, feeds down and carries on.
Under Start from you can also pick the start of any of the job's toolpaths instead of the saved point: that toolpath is cut again from its first line (after a probe gone wrong, say).
Frame job #
Rapids around the outline of the job at the safe height, so you can see that it sits where you expect on the stock before anything is cut.
Check mode #
Check mode: run without moving ($C) makes grbl read the program without moving, to find lines it would reject. Leaving check mode resets the controller.
Switch to the Machine view when a job starts #
When ticked, pressing Start brings up the Machine view, so you can watch the cut.
Toolpath lines in the Machine view #
Shows or hides the job's toolpath lines in the Machine view, over the stock as it is cut. View > Toolpaths in Machine view is the same switch.
Console #
The Console shows everything sent to the controller (>) and every reply (<), and has a
line to type your own G-code or $ commands. Press Enter or Send to send; the up and
down arrows recall earlier commands.
| Button | Sends |
|---|---|
$$ |
The controller's settings |
$# |
The work offsets and probe result |
$G |
The modal state (G54, G21, G90...) |
$I |
Build information |
$X |
Unlock |
| Reset | A soft reset (Ctrl-X) |
Status reports and ok replies show or hide the frequent status and ok lines;
Clear empties the log and Scroll to the newest line follows the latest output. A single
?, ! or ~ typed on its own is sent as the realtime command (status, hold, resume).
Controller settings #
Machine > Controller Settings ($$)... (or Grbl settings ($$)... on the Console) lists
the controller's $ settings with their names, units and descriptions, grouped by topic.
Type in Filter to find one by number, name or description.
Edit a value and it is outlined until you click Apply changes, which sends all changed values and reads the settings back. Refresh reads them again, Export... saves them to a text file as a backup and Import... loads such a file as pending changes, so you can check them before applying.
Warning: These settings are the machine's calibration: steps per mm, speeds, limits. Export a backup before you change anything.